Kafka源码阅读06: Produce请求(1): 写入本地日志

回顾

前一节介绍了Message的格式及其实现,本来是继续阅读MessageSet,但后来发现在Kafka 0.11.0之后MessageMessageSet(消息集)发生了较大改变,详细参考Kafka Protocol - Messagesets,实际和生产者消费者交互的是RecordBatch而非MessageSet,原来的MessageSet只是简单地在若干Message之前加入offset字段和消息数量字段,现在的RecordBatch多了不少字段,比如ProducerId/ProducerEpoch等。目前脱离了对API协议的实际处理过程去看这些数据结构的实现很难明白其实际意义,因此先阅读API请求。

本文就先阅读生产者的请求,其类型为Produce,对应KafkaApis.handle()中的下列分支:

1
case ApiKeys.PRODUCE => handleProduceRequest(request)

Produce协议

本节参考Produce API。Produce API使用通用的消息集格式,由于在发送时无法确定消息的offset,因此生产者可以随意填充该字段。

请求格式

Kafka 1.1使用的Produce请求是v2(实际上和v0及v1相同):

1
2
3
4
5
ProduceRequest => RequiredAcks Timeout [TopicName [Partition MessageSetSize MessageSet]]
RequiredAcks => int16
Timeout => int32
Partition => int32
MessageSetSize => int32

这种描述格式是Kafka wiki的标准请求格式,field => type代表字段fieldtype类型,field => [type]代表field字段包含若干个type类型,也就是[]代表数组。

因此这里的消息请求的格式,可以看作包含1个2字节整型RequiredAcks,1个4字节整型Timeout,接下来是N个结构,每个结构都有1个TopicName,以及若干个子结构,每个子结构由1个Partition/MessageSetSize/MessageSet组成。

然后介绍官方对上述参数的定义:

  • RequiredAcks(下文简称acks)

    指定服务端在响应请求之前应该受到多少确认(ack):

    • 0:服务器不发送任何响应(这是服务器不回复请求的唯一情况);
    • 1:服务器在等待数据写入本地日志后才会发送响应;
    • -1:服务器在等待所有同步副本提交消息之后才发送响应。

    0和1很好理解,0就是生产者发完就不管了,1就是等待消息被写入本地日志之后再返回,这里涉及到同步副本(isr,in-sync replicas)这个概念。这里简单介绍下。用Kafka自带脚本创建topic时会指定--replication-factor,也就是消息日志的复制数量,此时会创建多个副本(replicas)来保存消息日志,在Leader写入消息日志到本地时,副本也会从Leader取得消息,写入到自己的消息日志。暂且不提其同步过程,可以认为目前存活且消息写入跟上Leader的副本就是同步副本。

  • Timeout

    服务器可以等待RequiredAcks指定数量的确认所用的最长时间,单位:ms。这个参数并不是请求时间的确切限制,因为:

    1. 网络传输延迟不包含在内;
    2. 计时器在处理请求时才开始,因此如果很多请求正在排队等待处理,那么这个等待时间不包含在内;
    3. 我们不会终止本地写操作,因此如果本地写入时间超时,将不予考虑,要获得这种类型的超时,客户端应该使用socket的超时。
  • TopicName:发布数据的目标主题;

  • Partition:发布数据的目标分区;

  • MessageSetSize:紧接着的MessageSet字段的字节数;

  • MessageSet:消息集的标准格式,参考Protocol - Messagesets,注意Kafka 1.1使用的是v2版本的RecordBatch。

响应格式

Kafka 1.1使用的是0.10.0后支持的v2版本,因此v0版本和0.9.0后支持的v1版本就先无视了。

1
2
3
4
5
6
7
ProduceResponse => [TopicName [Partition ErrorCode Offset Timestamp]] ThrottleTime
TopicName => string
Partition => int32
ErrorCode => int16
Offset => int64
Timestamp => int64
ThrottleTime => int32
  • Topic:响应对应的主题;

  • Partition:响应对应的分区;

  • ErrorCode:当前分区的错误码;

    错误码是基于分区的,因为指定分区可能不可用或者无法在其他主机上维护而其他分区可能成功接受了Produce请求;

  • Offset:赋值给消息集中第1条消息的offset;

  • Timestamp:从UTC epoch至今的毫秒数,根据时间戳类型有不同的设定:

    • 时间戳类型为LogAppendTime,则为broker赋值给该消息集的时间戳,消息集内的所有内部消息都拥有同一个时间戳;
    • 时间戳类型为CreateTime,则该字段总是-1。

    如果没有错误码返回,那么生产者可以认为Produce请求的时间戳已被broker接受。

  • ThrottleTime:由于超过了quota(限额)而导致请求被限流的时间间隔,单位:毫秒。

handleProduceRequest

1
2
3
4
5
6
7
def handleProduceRequest(request: RequestChannel.Request) {
// 将 ByteBuffer 类型的请求解析成 ProduceRequest 类型
val produceRequest = request.body[ProduceRequest]
// 取得请求的总字节数, 包含 header 和 body
val numBytesAppended = request.header.toStruct.sizeOf + request.sizeOfBodyInBytes
// ...
}

其中headersizeofBodyInBytesnetwork.RequestChannel类中定义

1
2
3
4
5
6
7
8
9
10
11
class Request(/* ... */
val context: RequestContext,
/* ... */
@volatile private var buffer: ByteBuffer,
/* ... */) extends BaseRequest {
private val bodyAndSize: RequestAndSize = context.parseRequest(buffer)

def header: RequestHeader = context.header
def sizeOfBodyInBytes: Int = bodyAndSize.size
// ...
}

请求头之前在网络层阅读之RequestChannel中提过,这里简单回顾下。RequestHeader为Java类,定义在org.apache.kafka.common.requests包中,包含以下字段

1
2
3
4
private final ApiKeys apiKey;    // 请求类型
private final short apiVersion; // API版本
private final String clientId; // 用户指定的客户端ID
private final int correlationId; // 用户提供的整数值,将和响应一起返回

对应消息协议的Headers:

1
2
3
4
5
Request Header => api_key api_version correlation_id client_id 
api_key => INT16
api_version => INT16
correlation_id => INT32
client_id => NULLABLE_STRING

Processor处理客户端的请求字节序列时,会调用RequestHeader.parse方法构造请求头,然后和字节序列buffer一起发送给RequestChannelHandler线程从中取得请求发送给KafkaApis处理。

后面是一些认证相关的代码,调用了authorize方法,由于不影响主要流程,所以暂且跳过,最后会进入以下分支:

1
2
3
4
5
6
7
8
9
10
11
12
13
14
15
16
val internalTopicsAllowed = request.header.clientId == AdminUtils.AdminClientId

// call the replica manager to append messages to the replicas
// 传入replicaManager来添加消息到副本上
replicaManager.appendRecords(
timeout = produceRequest.timeout.toLong, // Produce请求的timeout字段
requiredAcks = produceRequest.acks, // Produce请求的acks字段
internalTopicsAllowed = internalTopicsAllowed, // client id是否为__admin_client
isFromClient = true, // 这里是处理客户端的Produce请求,所以为true
entriesPerPartition = authorizedRequestInfo, // 通过认证的请求信息
responseCallback = sendResponseCallback, // 发送响应的回调函数
processingStatsCallback = processingStatsCallback) // 处理stats的回调函数

// if the request is put into the purgatory, it will have a held reference and hence cannot be garbage collected;
// hence we clear its data here in order to let GC reclaim its memory since it is already appended to log
produceRequest.clearPartitionRecords() // 简单将Produce请求的partitionRecords置为null

留意最后的操作,提到了purgatory这个概念:如果请求被放入purgatory,那么就会被(purgatory)持有引用,因此将其置为null防止被垃圾收集。也是之后涉及再看。

其中,entriesPerPartition是之前认证过程得到的信息:

1
2
3
4
5
6
7
8
9
10
11
12
13
val authorizedRequestInfo = mutable.Map[TopicPartition, MemoryRecords]()

// 从 produceRequest.partitionRecords 取得所有 TopicPartiton 和 MemoryRecords
// ***OrFail 方法仅仅检查 partitionRecords 字段是否为 null, 若为 null 则抛出异常
for ((topicPartition, memoryRecords) <- produceRequest.partitionRecordsOrFail.asScala) {
if (!authorize(request.session, Write, new Resource(Topic, topicPartition.topic)))
unauthorizedTopicResponses += topicPartition -> new PartitionResponse(Errors.TOPIC_AUTHORIZATION_FAILED)
else if (!metadataCache.contains(topicPartition.topic))
nonExistingTopicResponses += topicPartition -> new PartitionResponse(Errors.UNKNOWN_TOPIC_OR_PARTITION)
else // 通过了 authorize 方法认证, 并且 metadataCache 包含该 topic
authorizedRequestInfo += (topicPartition -> memoryRecords)
}

Idea调试

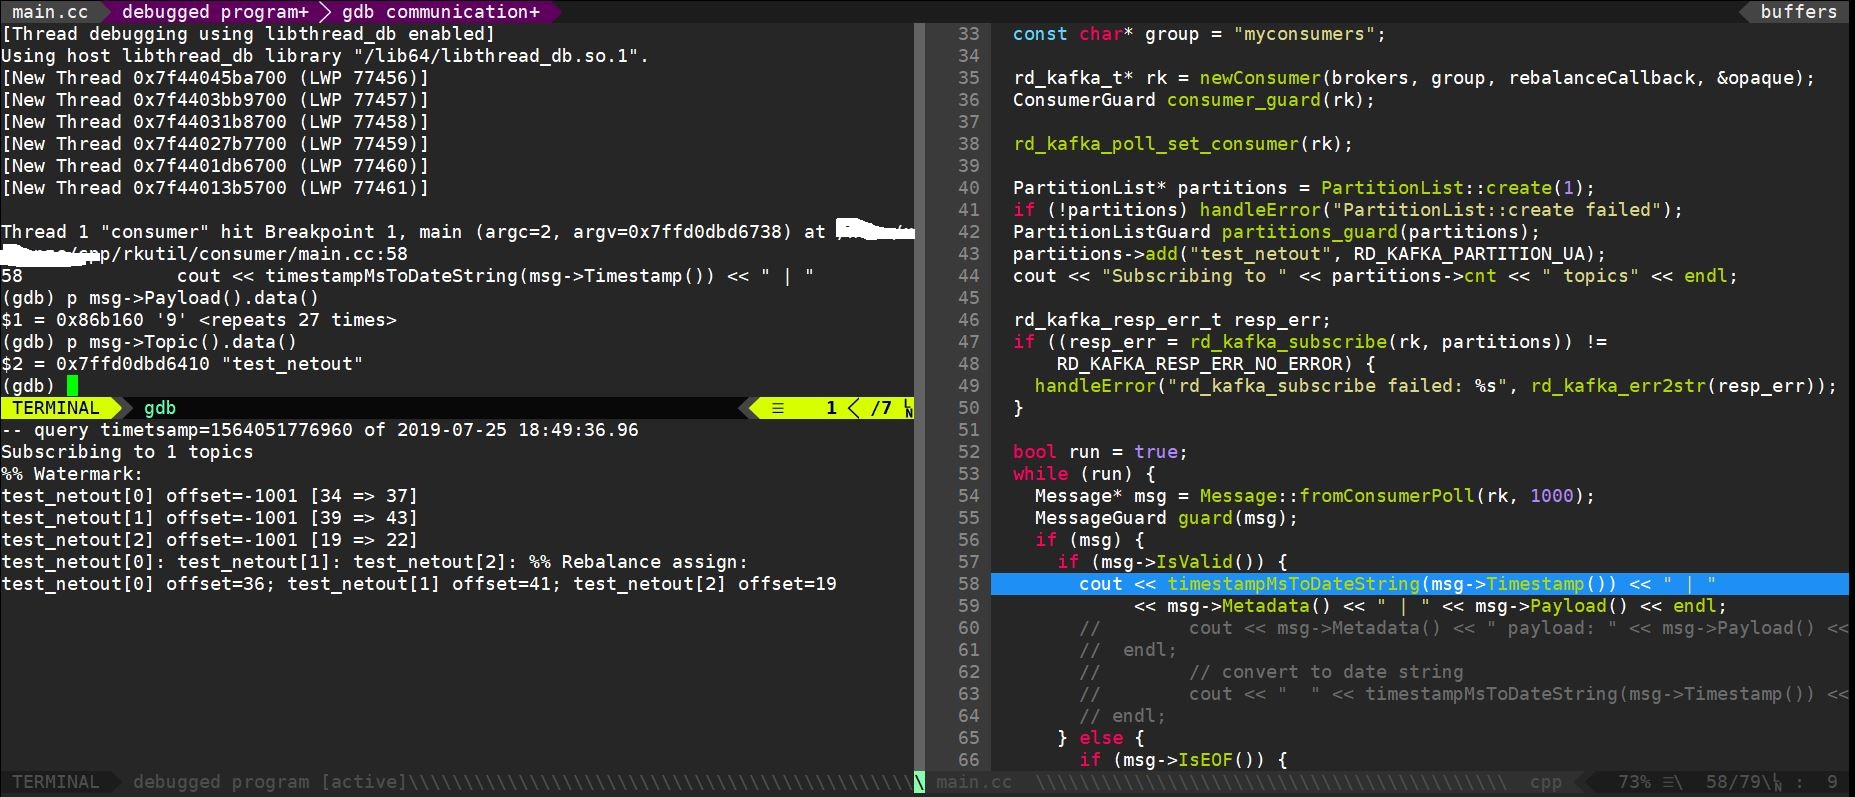
追根刨底去看metadataCache的构造和读取略麻烦,而且偏离了我们这篇文章的核心目的(了解Kafka怎么处理Produce请求)这里就利用Intellij Idea调试先看看里面到底是什么,也是阅读源码以来第1次调试。

首先zkServer命令启动Zookeeper服务端,然后在Idea中在定义authorizedRequestInfo处设断点,调试模式启动Kafka的core模块(即Kafka服务端),然后启动Kafka客户端,向test主题发送字符串hello,此时可以看到metadataCache的结构:

  • brokerId = 0
  • cache = “HashMap” size = 2
    • 0 = …
      • _1 = “__consumer_offsets”
        • value = {char[18]@5303}
        • hash = -970371369
      • _2 = “HashMap” size = 50
    • 1 = …
      • _1 = “test”
        • value = {char[4]@5410}
        • hash = 3556498
      • _2 = “HashMap” size = 1

可见其cache字段为HashMap类型,包含了所有的topic,一个是我们创建的test主题,一个是用来管理消费者提交的offset的__consumer_offsets

因此保证了authorizedRequestInfo,也就是传入appendRecordsentriesPerPartition参数,它的topic都是目前现有的。

ReplicaManager.appendRecords

将消息添加到分区的首领副本,等待它们被复制到其他副本。无论是timeout或者acks的条件被满足,都会触发回调函数。如果回调函数本身已经在某个对象上被同步,那么传递这个对象来避免死锁。

1
2
3
4
5
6
7
8
9
10
11
12
13
14
15
16
17
18
19
20
21
22
23
def appendRecords(timeout: Long,
requiredAcks: Short,
internalTopicsAllowed: Boolean,
isFromClient: Boolean,
entriesPerPartition: Map[TopicPartition, MemoryRecords],
responseCallback: Map[TopicPartition, PartitionResponse] => Unit,
delayedProduceLock: Option[Lock] = None,
processingStatsCallback: Map[TopicPartition, RecordsProcessingStats] => Unit = _ => ()) {
if (isValidRequiredAcks(requiredAcks)) { // acks只能为-1,0,1
// ...
} else {
// acks 在可接受的范围外, 则客户端肯定出错了, 仅仅返回错误, 而不用处理请求
// 具体处理: 对每个 TopicPartition 对象, 构造相应的 PartitionResponse 对象组成新的 Map
// 其中包含 error, baseOffset, logAppendTime, logStartOffset 等字段,
// 除了 error 字段标明为 acks不合法 外, 其余字段都随意设置
val responseStatus = entriesPerPartition.map { case (topicPartition, _) =>
topicPartition -> new PartitionResponse(Errors.INVALID_REQUIRED_ACKS,
LogAppendInfo.UnknownLogAppendInfo.firstOffset, RecordBatch.NO_TIMESTAMP, LogAppendInfo.UnknownLogAppendInfo.logStartOffset)
}
// 调用传入的回调 responseCallback 将返回值发送回去
responseCallback(responseStatus)
}

先看else分支,可以得知,传入的entriesPerPartitionTopicPartitionMemoryRecords(消息)的Map而传入的responseCallback为发送响应给客户端的回调函数,响应类型也是Map,key也是TopicPartition,只不过value变成了PartitionResponse。也就是说,无论是请求还是响应,都是以分区为单位的,对于错误的响应,只有error字段起作用,而正确的响应是包含baseOffsetlogAppendTimelogStartOffset等字段,前2个字段在上一篇消息协议阅读中简单提过,分别是消息日志中第1个offset以及发送的消息被写入消息日志的时间戳,现在具体阅读acks合法时的处理流程。
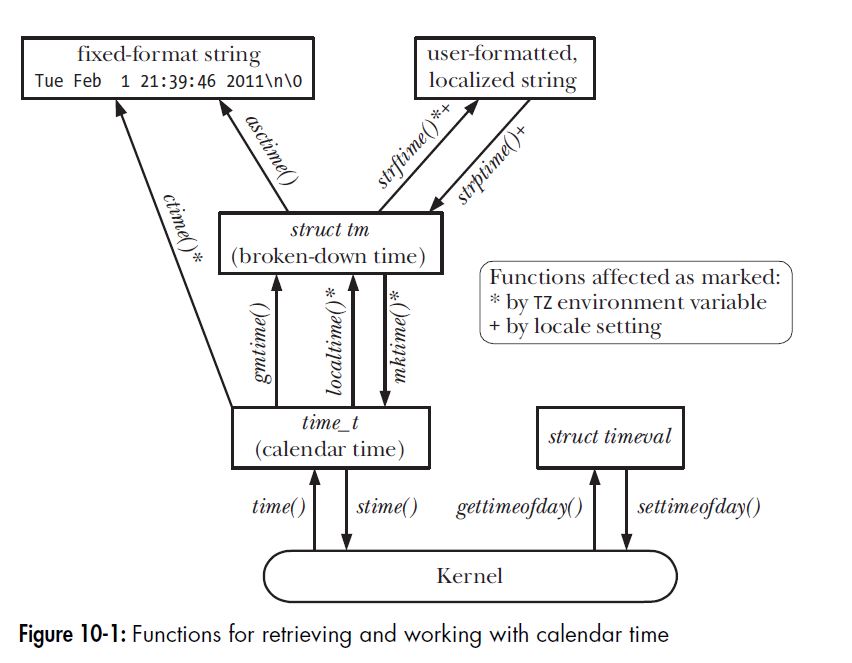
time字段

首先取得毫秒级的time

1
2
val sTime = time.milliseconds

其中timereplicaManager的构造参数,而replicaManager也是KafkaApis的构造参数:

1
2
3
4
class ReplicaManager(val config: KafkaConfig,
metrics: Metrics,
time: Time,

1
2
3
class KafkaApis(val requestChannel: RequestChannel,
val replicaManager: ReplicaManager,

KafkaApis对象是在KafkaServerstartup方法中创建的,层层追溯如下:

1
2
apis = new KafkaApis(socketServer.requestChannel, replicaManager, /* ... */)

1
2
replicaManager = createReplicaManager(isShuttingDown)

1
2
3
protected def createReplicaManager(isShuttingDown: AtomicBoolean): ReplicaManager =
new ReplicaManager(config, metrics, time, /* ... */)

1
2
class KafkaServer(val config: KafkaConfig, time: Time = Time.SYSTEM,

1
2
3
public interface Time {
Time SYSTEM = new SystemTime();

可见timeSystemTime对象,作为计时器,包含以下常用方法:

  • milliseconds:取得毫秒级时间戳;
  • nanoseconds:取得纳秒级时间戳;
  • sleep(long ms):当前线程休眠指定毫秒数。

因此Kafka中一切用到计时器的类都会使用该对象,回过头看appendRecords代码:

1
2
3
4
5
6
val sTime = time.milliseconds // 取得当前毫秒级时间戳
val localProduceResults = appendToLocalLog(internalTopicsAllowed = internalTopicsAllowed,
isFromClient = isFromClient, entriesPerPartition, requiredAcks)
// 调试信息: 再次取得时间戳, 相减得到 appendToLocalLog 的用时
debug("Produce to local log in %d ms".format(time.milliseconds - sTime))

也就是说首先会调用appendToLocalLog方法

appendToLocalLog

将消息添加到本地副本日志中

1
2
3
4
5
6
7
8
9
10
11
12
13
14
15
16
17
18
19
20
21
22
23
24
25
26
27
private def appendToLocalLog(internalTopicsAllowed: Boolean,
isFromClient: Boolean,
entriesPerPartition: Map[TopicPartition, MemoryRecords],
requiredAcks: Short): Map[TopicPartition, LogAppendResult] = {
trace(s"Append [$entriesPerPartition] to local log")
// 遍历所有客户端请求写入的 topicPartition 以及对应消息 records
entriesPerPartition.map { case (topicPartition, records) =>
// 更新topicStats,暂时略去不看
brokerTopicStats.topicStats(topicPartition.topic).totalProduceRequestRate.mark()
brokerTopicStats.allTopicsStats.totalProduceRequestRate.mark()
if (Topic.isInternal(topicPartition.topic) && !internalTopicsAllowed) {
// topic是内部主题: __consumer_offsets 或 __transaction_state, 且 internalTopicsAllowed 为 false
// (在 KafkaApis.handleProduceRequest 中, 只有请求的 clientId 为 AdminClientId 时才为 true)
// 也就是如果不是 Admin 客户端, 尝试写入内部主题则会返回 写入不合法 的 LogAppendResult
(topicPartition, LogAppendResult(
LogAppendInfo.UnknownLogAppendInfo,
Some(new InvalidTopicException(s"Cannot append to internal topic ${topicPartition.topic}"))))
} else { // 非内部主题, 可以写入
try {
// ...
} catch {
// 异常处理(略),会将处理客户端请求的异常信息写入返回结果中
// 注意,对于用于流程控制的Throwable异常,会单独处理,这里后面再看
}
}
}

首先是区分了消费主题是否为内部主题,比如__consumer_offsets,这种主题并不是存储生产/消费的消息的,因此只允许Admin客户端读写。至于brokerTopicStats也是度量指标相关的,暂且略过。

1
2
3
4
5
6
7
8
9
10
11
12
13
14
15
16
17
18
19
20
21
22
// 从内部的 allPartitions 中找到 topicPartition, PS: allPartitions 是从本地消息日志中读取的
val partitionOpt = getPartition(topicPartition)
val info = partitionOpt match {
case Some(partition) =>
// 找到的是 OfflinePartition (当前broker不在分区的ISR列表上) 则会(通过异常处理)返回错误信息
// https://issues.apache.org/jira/browse/KAFKA-6796 在 Kafka 2.0 中对这种行为进行了修复
// 比如在分区重分配期间, 客户的Produce请求在本地副本被删除后到达, 此时不应该返回分区不存在的错误
// 因此2.0中抛出的是 NotLeaderForPartitionException, 会强制让客户端更新元数据来找到新的分区位置
if (partition eq ReplicaManager.OfflinePartition)
throw new KafkaStorageException(s"Partition $topicPartition is in an offline log directory on broker $localBrokerId")
// 添加记录到leader副本上
partition.appendRecordsToLeader(records, isFromClient, requiredAcks)

// 若找不到目标 topicPartition, 则代表生产者向一个未知的分区生产消息, 返回表示分区不存在的结果
case None => throw new UnknownTopicOrPartitionException("Partition %s doesn't exist on %d"
.format(topicPartition, localBrokerId))
}

// 略去更新brokerTopicStats的代码

(topicPartition, LogAppendResult(info))

处理了2种错误:分区是离线的(Offline)和分区是未知,而对于已知分区,则是将appendRecordsToLeader方法返回的info来构造该分区对应的LogAppendResult作为返回结果。

这里通过getPartition返回的partition类型是Partition,位于cluster包中:

1
2
3
4
5
6
class Partition(val topic: String,
val partitionId: Int,
time: Time,
replicaManager: ReplicaManager,
val isOffline: Boolean = false)

除了主题名topic和分区号partitionId外,还会引用replicaManager用于将信息写入副本中。还通过isOffline来区分分区是否在副本broker上。

Partition.appendRecordsToLeader

1
2
3
4
5
6
7
8
9
10
11
12
13
14
15
16
17
18
19
20
21
22
23
24
25
26
27
28
29
30
31
32
33
34
35
36
37
38
39
40
def appendRecordsToLeader(records: MemoryRecords, isFromClient: Boolean, requiredAcks: Int = 0): LogAppendInfo = {
// 用读锁保护, 可以多线程添加记录到 leader副本 上, 但是如果ISR更新过程会获取写锁, 此时要等待ISR更新完毕
val (info, leaderHWIncremented) = inReadLock(leaderIsrUpdateLock) {
// 若leader副本的id为本地的broker id, 则返回对应的 Replica对象
leaderReplicaIfLocal match {
case Some(leaderReplica) => // leader副本
val log = leaderReplica.log.get // append-only的Log对象
val minIsr = log.config.minInSyncReplicas // min.insync.replicas 配置
val inSyncSize = inSyncReplicas.size // ISR数量

// acks为-1时, 客户端会等待所有ISR确认收到消息时才返回, 此时配置 min.insync.replicas
// 指定了这个ISR的最小数量, 因此ISR数量不够时会抛出ISR副本太少的异常
if (inSyncSize < minIsr && requiredAcks == -1) {
throw new NotEnoughReplicasException("Number of insync replicas for partition %s is [%d], below required minimum [%d]"
.format(topicPartition, inSyncSize, minIsr))
}

// 将消息集写入日志, 分配 offsets 和 分区leader的epoch
val info = log.appendAsLeader(records, leaderEpoch = this.leaderEpoch, isFromClient)
// probably unblock some follower fetch requests since log end offset has been updated
// 因为 LEO(log end offset) 已经更新了, 所以某些 follower 的 fetch请求可能解除阻塞了, 于是
// replicaManager.delayedFetchPurgatory 尝试完成该分区的延迟的fetch请求, 因为 LEO(log end offset)已经跟新
replicaManager.tryCompleteDelayedFetch(TopicPartitionOperationKey(this.topic, this.partitionId))
// 因为 ISR 可能只剩1个, 因此可能需要增加HW (high watermark)
(info, maybeIncrementLeaderHW(leaderReplica))

case None => // 非leader副本
throw new NotLeaderForPartitionException("Leader not local for partition %s on broker %d"
.format(topicPartition, localBrokerId))
}
}

// some delayed operations may be unblocked after HW changed
// 一些延迟操作可能因为 HW 的改变而解除阻塞, 因此尝试完成这些延迟请求
if (leaderHWIncremented)
tryCompleteDelayedRequests()

info // log.AppendAsLeader返回的结果
}

这里有几个方法暂时没看细节,将其列出(对于server包之外的标注包名),之后有可能的话单独阅读:

  • log.Log.appendAsLeader:将消息集,分配的offset,leader副本的epoch写入本地消息日志;
  • DelayedOperation.checkAndComplete(key: Any):检查某些**延迟操作(delayed operations)**用给定的key能否完成,若能则完成;
  • cluster.Partition.maybeIncrementLeaderHW:检查并且可能增加分区的HW,仅当分区ISR改变或者任意副本的LEO改变时才更新。

由于本小节涉及到分区的操作,来回顾一些基本概念,每个分区都有多个broker来保存,实现消息的冗余备份,这些broker称为该分区的副本(replica)。对每个分区,存在唯一的leader副本(通过选举产生),与客户端进行直接读写,而其他副本为follower,不断地从leader复制最新的消息。与leader保持同步的follower被称为**ISR(in-sync replica)**,而某些follower会因为某些原因复制速度较慢或者和leader断开连接(通过某种规则判断),此时会从ISR中移除,直到重新跟上进度会重新加入ISR。

HW(high watermark, 高水位)即最新已提交的(committed)消息的offset,即所有ISR的分区日志上都写入了该消息,消费者无法拉取比HW更大的offset,从而保证leader一旦不可用,消费者之前消费的消息存在于任意ISR的消息日志中。

**LEO(log end offset)**是所有副本都会维护的offset,即当前副本最后一个消息的offset+1,也就是如果有新的消息写入,那么它的offset即之前的LEO,而副本将消息写入消息日志后,LEO会递增。

至于epoch这个概念是Kafka 0.11引入的,暂时还不清楚具体功能,之后再提。

appendToLocalLog总结

在之前将客户端发送的请求解析成了分区消息集的映射,而返回值是分区LogAppendResult的映射,因此只对遍历整个Map,对每对分区消息集进行处理得到LogAppendResult即可:

  1. __consumer_offsets这样的内部主题,验证请求头的client id是否为管理员(admin)的id,否则返回Cannot append to internal topic的错误;
  2. ReplicaManager维护的当前broker上的分区列表中找到对应的分区;
  3. 若查找失败则返回*Partition … doesn’t exist on …*的错误;
  4. 若分区不可用,则返回*Partition … is in an offline log directory on broker …*的错误;
  5. 若当前broker不是分区的leader,则返回*Leader not local for partition … on broker …*的错误;
  6. 若acks字段为-1,且ISR数量小于min.insync.replicas配置的数量,则返回Number of insync replicas for partition … is … below required minimum的错误;
  7. 将消息集写入本地日志,并给当前分区分配offsets和leader epoch;
  8. 处理延后处理的Fetch请求,可能更新HW;
  9. 若更新HW,则处理延后处理的请求。

前面的流程都是一些合法性判断,主要是7~9这几步,待深入阅读的内容:

  1. 对指定分区,写入日志后如何分配offsets和leader epoch?
  2. 延后处理是怎么实现的?

关于延后处理,主要是ReplicaManager的以下字段

1
2
3
4
val delayedProducePurgatory: DelayedOperationPurgatory[DelayedProduce],
val delayedFetchPurgatory: DelayedOperationPurgatory[DelayedFetch],
val delayedDeleteRecordsPurgatory: DelayedOperationPurgatory[DelayedDeleteRecords]

都是Purgatory(炼狱),在辅助构造器中进行默认构造:

1
2
3
4
5
6
7
8
9
10
DelayedOperationPurgatory[DelayedProduce](
purgatoryName = "Produce", brokerId = config.brokerId,
purgeInterval = config.producerPurgatoryPurgeIntervalRequests),
DelayedOperationPurgatory[DelayedFetch](
purgatoryName = "Fetch", brokerId = config.brokerId,
purgeInterval = config.fetchPurgatoryPurgeIntervalRequests),
DelayedOperationPurgatory[DelayedDeleteRecords](
purgatoryName = "DeleteRecords", brokerId = config.brokerId,
purgeInterval = config.deleteRecordsPurgatoryPurgeIntervalRequests),

都是泛型类DelayedOperationPurgatory,类型参数不同。

总结

本篇开始阅读Produce请求的处理,首先从官网阅读了Kafka 1.1对应的Produce请求和响应协议,然后阅读KafkaApis类的处理方法handleProduceRequest

跳过了加密/认证的部分,实际上是由ReplicaManager来处理,调用appendRecords方法,接受了客户端Produce请求中的acks和timeout两个关键字段。

首先验证acks是否合法(-1, 0 or 1),对不合法acks发送INVALID_REQUIRED_ACKS响应。

然后调用appendToLocalLog方法,也是本篇主要阅读的部分。

之后的处理,以及appendRecords接收的回调函数(比如如何发送响应)的实现,日志的写入,分区的offsets和leader epoch的更新,以及如何延迟处理将在之后进行阅读。

Kafka源码阅读05-消息协议阅读之Message

回顾

之前阅读了网络层和API层,在阅读API层支持的Kafka协议之前,首先得明确Kafka的消息概念。Kafka服务器被称为broker,与其交互的是客户端,分为生产者(Producer)消费者(Consumer),客户端与服务端通过消息进行交互。

Kafka使用日志文件(下文称为消息日志)来保存消息,通过log.dirs配置指定日志文件的存放目录。注意这里的日志文件不同于Kafka本身的日志(记录运行时的一些信息)。而对于每个分区,都会在log.dirs下创建一个子目录来存放消息日志,其命名为<topic>-<partition>,在该目录下会有像这样的文件:

1
2
$ ls
00000000000000000020.index 00000000000000000020.log 00000000000000000020.timeindex leader-epoch-checkpoint

同一分区的不同消息是通过offset来唯一标识的,注意它并不是消息在消息日志中实际存储位置的偏移量,而是类似id一样的概念,从0开始递增,表示分区内第offset条消息。

消息日志的命名规则是[baseOffset].log,比如这里的20就是该日志的第baseOffset,即消息日志中的第1条消息的offset。相应地,有同名的.index文件,为消息建立了索引方便查询消息,但并没有对每条消息都建立了索引。

因此首先看看Kafka的消息实现,即message包,本文主要讲Message类。

消息格式

Message类的注释给出了格式说明,如下图所示:

1
2
3
4
5
字节数 |   4   |   1   |     1     |     8     |   4    |  K  |  4  |    V    |
字段名 | CRC32 | magic | attribute | timestamp | keylen | key | len | payload |
/ \
| 7 | 6 | 5 | 4 | 3 | 2 | 1 | 0 |
0~2: 压缩类型;3: 时间戳类型

补充说明:

  • magic代表消息格式,其值为0代表v0,为1代表v1;
  • v0版本的消息使用绝对offset,且不包含timestamp字段,attribute第3位不使用;
  • v1版本的消息使用相对offset,且包含timestamp字段,attribute第3位为时间戳类型;
  • K是字段keylen的值,V是字段len的值。

外部消息和内部消息

看看消息的主构造器

1
2
3
class Message(val buffer: ByteBuffer,
private val wrapperMessageTimestamp: Option[Long] = None,
private val wrapperMessageTimestampType: Option[TimestampType] = None)
  • buffer:消息的字节缓冲区;
  • wrapperMessageTimestamp:外部消息的时间戳;
  • wrapperMessageTimestampType:外部消息的时间戳类型;

这里的wrapperMessage指的是外部消息,因为Kafka会对多个消息一起进行压缩提高压缩率,所以将N个消息压缩后的消息称为外部消息,而这N个消息则称为内部消息

1
2
3
外部消息offset | 100 |     105    | 106 | 107 | ...
/ \
内部消息offset | 0 | 1 | 2 | 3 | 4 |

这样做是因为生产者对一批消息压缩时,它是不知道消息的offset时(因为offset是由broker指定的),所以就简单地将offset字段从0开始依次递增来设置。

而broker在收到这批消息时,它知道前1个消息的offset(比如在这里就是100),也知道生产者发送过来的这批消息的数量(5),那么下一个外部消息的offset就被设置为100+5=105。

消费者取得的是外部消息,当消费者通过解压得到每个消息时,可以用外部offset和内部offset计算出内部消息的绝对offset(101~105)。

getter方法

对这种基于字节的消息协议的实现很简单,利用ByteBuffer对象存储字节序列,然后用伴生对象的常量来指定某个字段的长度(length)和偏移量(offset),从而通过其字节区间[offset, offset + length)访问该字段。

再次注意:这里提到的偏移量指的是字节在缓冲区中的位置,不同于消息的offset。

Message伴生对象中定义一系列常量来记录各字段的offset和length:

1
2
3
4
5
6
7
8
object Message {
val CrcOffset = 0
val CrcLength = 4
val MagicOffset = CrcOffset + CrcLength
val MagicLength = 1
val AttributesOffset = MagicOffset + MagicLength
// ...
}

然后对于crcmagic这种整型字段的getter方法直接调用ByteBuffer.getInt(index)方法即可(注意不能用getInt()方法,因为它是从内部position开始读的)

1
2
def checksum: Long = ByteUtils.readUnsignedInt(buffer, CrcOffset)
def magic: Byte = buffer.get(MagicOffset)

对于多字节的字段crc,使用的是Java类ByteUtils的相关方法,将多个字节转换成目标整型,实际上还是首先调用ByteBuffergetXXX(index)方法

1
2
3
public static long readUnsignedInt(ByteBuffer buffer, int index) {
return buffer.getInt(index) & 0xffffffffL;
}

对于keypayload这种运行期才确定长度的字段,其编码方式是用户自定义的,所以只需要返回一个ByteBuffer即可,具体编解码应该在客户端进行:

1
2
3
4
5
6
7
8
9
10
11
12
13
14
15
16
17
18
19
20
21
22
23
24
25
26
def payload: ByteBuffer = sliceDelimited(payloadSizeOffset)
def key: ByteBuffer = sliceDelimited(keySizeOffset)

// 由于key字段长度是动态的,所以无法在object中定义payloadSizeOffset常量,而需要在类中取得key的长度后计算而出
private def payloadSizeOffset = {
if (magic == MagicValue_V0) KeyOffset_V0 + max(0, keySize)
else KeyOffset_V1 + max(0, keySize)
}

private def sliceDelimited(start: Int): ByteBuffer = {
val size = buffer.getInt(start) // 取得前4个字节表示的长度
if(size < 0) {
null
} else {
// 拷贝一份,防止影响buffer的position,注意这里的拷贝并没拷贝内部的字节序列
var b = buffer.duplicate()
// 跳过表示长度的4个字节,回顾协议,key和payload之前都有4个字节表示长度
b.position(start + 4)
// 取得buffer从position开始的子序列,并重置长度和position
// 之后b就是指向key或payload字段并且长度合适的ByteBuffer了
b = b.slice()
b.limit(size)
b.rewind
b
}
}

时间戳

Kafka的消息格式在0.10.0的一个重要变化是加入了时间戳字段,见upgrade to 0.10.0.0,为了保持旧消息的兼容,才有了magic标识是否使用时间戳,并且支持对API版本的请求:Retrieving Supported API versions。值得一看的是timestamp的getter:

1
2
3
4
5
6
7
8
9
10
11
12
13
def timestamp: Long = {
if (magic == MagicValue_V0) // v0版本的消息不使用时间戳
Message.NoTimestamp
// 对v1版本的消息,有以下3种Case:
// 1. 外部消息的时间戳及其类型都为None;
// 2. 外部消息的时间戳类型为LogAppendTime且时间戳非None;
// 3. 外部消息的时间戳类型为CreateTime且时间戳非None。
// Case 2
else if (wrapperMessageTimestampType.exists(_ == TimestampType.LOG_APPEND_TIME) && wrapperMessageTimestamp.isDefined)
wrapperMessageTimestamp.get
else // Case 1, 3
buffer.getLong(Message.TimestampOffset)
}

后2种Case都代表当前消息是内部消息,也就是说和其他内部消息一起被压缩了,只有时间戳类型为LogAppendTime时才使用外部消息的时间戳。

辅助构造器

一般不会直接传入ByteBuffer,而是传入消息协议的各个字段来构造,也就是辅助构造器

1
2
3
4
5
6
7
8
9
10
11
12
13
14
15
16
17
18
19
20
21
22
23
24
25
26
27
28
29
30
31
32
33
34
35
36
37
38
39
40
41
42
43
44
45
46
47
48
49
50
51
52
53
54
55
56
def this(bytes: Array[Byte], 
key: Array[Byte],
timestamp: Long,
timestampType: TimestampType,
codec: CompressionCodec,
payloadOffset: Int,
payloadSize: Int,
magicValue: Byte) = {
// 计算总长度,分配对应大小的ByteBuffer
this(ByteBuffer.allocate(Message.CrcLength +
Message.MagicLength +
Message.AttributesLength +
(if (magicValue == Message.MagicValue_V0) 0
else Message.TimestampLength) +
Message.KeySizeLength +
(if(key == null) 0 else key.length) +
Message.ValueSizeLength +
(if(bytes == null) 0
else if(payloadSize >= 0) payloadSize
else bytes.length - payloadOffset)))
// 验证magic和timestamp是否对应:
// 1. magic只能为0或1;
// 2. 时间戳必须为非负数或-1(代表不使用时间戳);
// 3. magic为0时timestamp必须为-1,因为v0版本不支持时间戳;
validateTimestampAndMagicValue(timestamp, magicValue)
// skip crc, we will fill that in at the end
// 跳过CRC字段,先填充后面的部分
buffer.position(MagicOffset)
buffer.put(magicValue) // 填充 magic
// 根据压缩类型和时间戳类型计算 attribute 并填充
val attributes: Byte = LegacyRecord.computeAttributes(magicValue, CompressionType.forId(codec.codec), timestampType)
buffer.put(attributes)
// Only put timestamp when "magic" value is greater than 0
if (magic > MagicValue_V0) // 仅当magic大于0才可以填充时间戳
buffer.putLong(timestamp)
if(key == null) { // key为空则将keylen填充为-1,代表key不存在
buffer.putInt(-1)
} else { // 否则填充 keylen 和 key
buffer.putInt(key.length)
buffer.put(key, 0, key.length)
}
// 类似key,若bytes为空,填充len为-1,否则填充 bytes 的指定部分
// payloadOffset指定起始偏移量,payloadSize指定填充字节数(若<0则填充偏移量之后的所有字节)
val size = if(bytes == null) -1
else if(payloadSize >= 0) payloadSize
else bytes.length - payloadOffset
buffer.putInt(size)
if(bytes != null)
buffer.put(bytes, payloadOffset, size)
buffer.rewind() // 重置position为初始,以便之后getXXX()读取

// now compute the checksum and fill it in
// 后面字段填充完了,计算CRC校验值并填充到前4个字节,完成后position为4,
// 也就是对内部buffer调用slice()方法返回的是magic字段至末尾的部分而不包含CRC字段
ByteUtils.writeUnsignedInt(buffer, CrcOffset, computeChecksum)
}

其他辅助构造器都是基于这个辅助构造器构造的,代码就不一一贴出。

Record类

class MessageasRecord()方法和object MessagefromRecord()方法提供了Message类和Java的LegacyRecord类的互相转化:

1
2
3
4
5
6
// object Message
def fromRecord(record: LegacyRecord): Message = {
val wrapperTimestamp: Option[Long] = if (record.wrapperRecordTimestamp == null) None else Some(record.wrapperRecordTimestamp)
val wrapperTimestampType = Option(record.wrapperRecordTimestampType)
new Message(record.buffer, wrapperTimestamp, wrapperTimestampType)
}
1
2
3
4
5
// class Message
private[message] def asRecord: LegacyRecord = wrapperMessageTimestamp match {
case None => new LegacyRecord(buffer)
case Some(timestamp) => new LegacyRecord(buffer, timestamp, wrapperMessageTimestampType.orNull)
}

可见两者的构造器完全一致,其实去看实现的话大多数方法也是一致的。只不过Record提供了一系列write()方法可以将内部存储的字节写入到DataOutputStream类中,而Message本身没有,因此要将Message写入数据流时需要调用asRecord转换成Record对象再调用write()方法。

此外LegacyRecord还提供了writeCompressedRecordHeader()方法在创建消息集(Message Set)时会使用,到时候再去阅读。

总结

本文内容比较简单,主要是阅读Kafka的消息格式的实现,Java/Scala使用ByteBuffer来实现基于字节的消息协议。Kafka在0.10.0中做出了较大改变,添加了时间戳字段,因此使用了magic字段来区分不同版本的消息。最后,Scala类Message也提供了与Java类LegacyRecord的转换方法,从而实现向数据流的写入。

Kafka源码阅读04-API层之Handler和Apis

回顾

之前通过网络层的阅读,我们知道了和客户端直接进行读写的是Processor,但是它会将请求通过RequestChannel发送给KafkaRequestHandler,同时也会接收KafkaApis通过RequestChannel回复的响应。因此从本篇开始阅读API层,也就是Handler和Apis,它们都是位于server包内。

Handler线程的创建

回顾请求的调用链

1
2
3
Processor.processCompleteReceives
\-- requestChannel.sendRequest(request)
\-- requestQueue.put(request)

ProcessorrequestChannel字段调用sendRequest()方法,该方法将请求放入其requestQueue字段中:

1
private val requestQueue = new ArrayBlockingQueue[BaseRequest](queueSize)

既然有入队,就肯定有出队,找到其poll()方法的调用处:

1
2
3
// 取得下一个请求,或者阻塞直到超时  
def receiveRequest(timeout: Long): RequestChannel.BaseRequest =
requestQueue.poll(timeout, TimeUnit.MILLISECONDS)

继续找到该方法的调用处,在KafkaRequestHandler.run()方法中:

1
val req = requestChannel.receiveRequest(300) // 300ms超时

KafkaRequestHandler实现了Runnable接口,也就是说,它在调用start()方法时就会启动线程,执行run()方法,查找使用它的地方,为KafkaRequestHandlerPool的字段:

1
val runnables = new mutable.ArrayBuffer[KafkaRequestHandler](numThreads)

Poll类管理了Handler线程,它默认创建了numThreads个Handler线程。

PS:这里使用了ArrayBuffer而非固定大小的Array,和之前提到的ProcessorAcceptor使用ConcurrentHashMap保存一样,都是为了支持resize操作。

再看看Pool类的使用处,它是KafkaServer的字段

1
var requestHandlerPool: KafkaRequestHandlerPool = null

KafkaServer才是真正的Kafka服务器的类,而之前介绍的SocketServer类只是它用来管理网络的部分,也是其中的一个字段:

1
var socketServer: SocketServer = null

再看看requestHandlerPool的使用处,位于KafkaServerstartup()方法:

1
2
3
requestHandlerPool = new KafkaRequestHandlerPool(config.brokerId,
socketServer.requestChannel,
apis, time, config.numIoThreads)

第1个参数为配置的broker.id,第2个参数为RequestChannel对象,第3个参数为KafkaApis对象,第4个参数为KafkaServer的构造参数,为SystemTime对象,位于common.util包内。

第5个参数为Handler线程的数量,为config.numIoThreads,对应配置文件的num.io.threads,默认值为8(见KafkaConfig.scalaDefaults伴生对象)。

而Pool类中创建Handler线程代码如下:

1
2
3
4
5
6
7
8
for (i <- 0 until numThreads) {
createHandler(i)
}

def createHandler(id: Int): Unit = synchronized {
runnables += new KafkaRequestHandler(id, brokerId, aggregateIdleMeter, threadPoolSize, requestChannel, apis, time)
KafkaThread.daemon("kafka-request-handler-" + id, runnables(id)).start()
}

id为Handler线程的编号(从0开始),aggregateIdleMeter为度量指标相关(配合time字段计算Handler线程闲置的时间,我们依旧忽略之),threadPoolSize为线程池大小(即线程数量)。剩余参数都是Pool类的构造参数。

至此,我们知道了KafkaServer管理了Handler线程池,会根据配置的num.io.threads创建对应数量的Handler线程,并且多个Handler线程共享了KafkaApis对象和RequestChannel对象。

Handler线程实现

忽略了日志和度量指标的部分:

1
2
3
4
5
6
7
8
9
10
11
12
13
14
15
16
17
18
19
20
21
22
23
24
25
26
27
28
29
30
31
32
def run() {
while (!stopped) {
// 从requestChannel中取得请求,timeout为300ms
val req = requestChannel.receiveRequest(300)

req match {
// Shutdown类型的请求,直接退出Handler线程
case RequestChannel.ShutdownRequest =>
debug(s"Kafka request handler $id on broker $brokerId received shut down command")
shutdownComplete.countDown()
return

// 正常请求
case request: RequestChannel.Request =>
try {
request.requestDequeueTimeNanos = endTime
// 交给apis处理
apis.handle(request)
} catch { // 处理api.handle()可能抛出的异常
case e: FatalExitError =>
shutdownComplete.countDown()
Exit.exit(e.statusCode)
case e: Throwable => error("Exception when handling request", e)
} finally {
request.releaseBuffer()
}

case null => // continue
}
}
shutdownComplete.countDown()
}

逻辑很简单,Handler线程反复地从requestChannel中取得请求,交由apis进行处理,如果处理出错会捕获异常,并以异常中包含的错误码退出当前线程。这也解释了前一篇的疑问:为何请求的发送对象是Handler线程,而响应却来自于Apis。

值得注意的地方是,这里还有个ShutdownRequest,是用来退出Handler线程的,找到它的调用处:

1
def sendShutdownRequest(): Unit = requestQueue.put(ShutdownRequest)

RequestChannel对象调用该方法将Shutdown请求加入队列中,而该方法的调用处位于KafkaRequestHandler内:

1
def initiateShutdown(): Unit = requestChannel.sendShutdownRequest()

进一步往上找,会发现位于KafkaRequestHandlershutdown()方法内,用于Handler线程的正常退出(相对而言,apis.handle()抛出异常则是异常退出,退出码不为0):

1
2
3
4
5
6
7
def shutdown(): Unit = synchronized {
info("shutting down")
for (handler <- runnables)
handler.initiateShutdown()
for (handler <- runnables)
handler.awaitShutdown()
}

至于awaitShutdown()方法,则是Java线程退出的惯用法,即调用了CountDownLatch对象的await()方法,等待计数归0,可以看到run()方法中不同的退出分支都会调用shutdownComplete.countDown()方法,即将CountDownLatch对象shutdownComplete的计数减1,而其初始计数为1:

1
private val shutdownComplete = new CountDownLatch(1)

Apis

KafkaApis对象的创建在KafkaRequestHandlerPool创建之前,其构造参数有18个,因此暂时不详细列出,最为关键的还是requestChannel。看看关键的handle()方法:

1
2
3
4
5
6
7
8
9
10
11
12
13
14
def handle(request: RequestChannel.Request) {
try {
request.header.apiKey match {
case ApiKeys.PRODUCE => handleProduceRequest(request)
case ApiKeys.FETCH => handleFetchRequest(request)
// 其他类型的的ApiKeys...
}
} catch {
case e: FatalExitError => throw e
case e: Throwable => handleError(request, e)
} finally {
request.apiLocalCompleteTimeNanos = time.nanoseconds
}
}

取得请求头的apiKey(见前一篇的请求头的解析一节),根据类型调用不同的handle*()方法进行处理,这里看一个比较简单的例子,是对LIST_OFFSETS请求的处理:

1
2
3
4
5
6
7
8
9
10
11
12
13
def handleListOffsetRequest(request: RequestChannel.Request) {
val version = request.header.apiVersion()

// 根据请求头的API版本进行不同的处理
val mergedResponseMap = if (version == 0)
handleListOffsetRequestV0(request)
else
handleListOffsetRequestV1AndAbove(request)

// 参数2为将requestThrottleMs作为输入的函数,会根据该输入创建ListOffsetResponse对象
// 并且在sendResponseMaybeThrottle类根据requestThrottleMs判断是否创建该对象并发送
sendResponseMaybeThrottle(request, requestThrottleMs => new ListOffsetResponse(requestThrottleMs, mergedResponseMap.asJava))
}

进一步的分析略过,总之Apis在处理完请求后,如果判断需要发送,则会创建响应的响应(*Response)类型,并调用sendResponse()方法:

1
2
3
4
5
6
7
8
9
10
11
12
13
14
15
16
17
private def sendResponse(request: RequestChannel.Request, responseOpt: Option[AbstractResponse]): Unit = {
// 对响应的每个非0错误码更新度量指标
responseOpt.foreach(response => requestChannel.updateErrorMetrics(request.header.apiKey, response.errorCounts.asScala))

responseOpt match {
case Some(response) =>
// 若响应存在,则构造响应的Send,并调用requestChannel的sendResponse()方法发送
val responseSend = request.context.buildResponse(response)
// 如果RequestChannel伴生对象的isRequestloggingEnabled则构造该字符串
val responseString =
if (RequestChannel.isRequestLoggingEnabled) Some(response.toString(request.context.apiVersion))
else None
requestChannel.sendResponse(new RequestChannel.Response(request, Some(responseSend), SendAction, responseString))
case None =>
requestChannel.sendResponse(new RequestChannel.Response(request, None, NoOpAction, None))
}
}

可见实际上,还是利用requestChannel.sendResponse()方法发送响应(参见前一篇的处理响应一节,会将响应加入Processor的响应队列中)。这里的Send接口表示的是待发送的数据,而String则是用于调试的:

1
2
3
4
5
6
7
object RequestChannel extends Logging {
private val requestLogger = Logger("kafka.request.logger")
// ...

def isRequestLoggingEnabled: Boolean = requestLogger.underlying.isDebugEnabled
// ...
}

这里需要额外说明下,Kafka的日志系统使用的是SLF4J,它本身只是日志的抽象层,而没有具体的实现,因此在编译运行Kafka时会提示警告:

SLF4J: Failed to load class “org.slf4j.impl.StaticLoggerBinder”. SLF4J: Defaulting to no-operation (NOP) logger implementation SLF4J: See http://www.slf4j.org/codes.html#StaticLoggerBinder for further details.

只有将具体的日志jar包放入classpath中,才会成功打印日志,因此从Kafka源码中是无法确定isRequestLoggingEnabled在哪里设置为true,取决于实际日志包的配置。

总结

API层其实还是很简单的,创建num.io.threads个Handler线程,从共享的RequestChannel中取出请求(使用ArrayBlockingQueue请求队列保证线程安全并且限制最大请求数),如果不是Handler调用shutdown()方法加入的关闭请求,则将其交给Apis对象进行处理,处理完请求后会构造响应对象,通过RequestChannel加入到Processor内部的响应队列(使用LinkedBlockingQueue响应队列保证线程安全,并且不限制最大响应数量)。

实际的请求的解析和响应的构造则集中于KafkaApis类中,接下来则是通过不同的ApiKey类依次看看Kafka支持哪些请求,并且内部是怎样处理这些请求。

Kafka源码阅读03: 网络层阅读之RequestChannel

回顾

前2篇分析了SocketServer的启动以及Acceptor/Processor,对配置listener的网络地址,都会创建1个Acceptor和N个Processor,其中N为配置num.network.thread。每个Acceptor会创建1个默认的NIO Selector,每个Processor则都会创建1个Kafka自行实现Selector接口的KSelector

socket都会被封装成Channel,即通道,代表socket两端的连接。Acceptor会创建一个Channel监听网络地址,并在其Selector注册读事件,然后负责将所有客户端的连接转换成Channel均衡地发送给Processor

Processor则在其Selector上注册从Acceptor收到的Channel的读/写/关闭连接等事件,并分别处理。但是Processor只负责读取请求(Request)和写入响应(Response),对于已完成的请求,会将其作为参数传给requestChannel调用sendRequest()。另一方面,Processor内部的响应队列,则是由requestChannel调用sendResponse()得到的。

RequestChannel包含requestQueue字段缓存请求,另外它也和SocketServer一样保存了所有Processor的id和自身组成的ConcurrentHashMap

处理请求

发送请求

Processor.processCompletedReceives()方法中,会将封装了网络地址信息的请求传递给sendRequest()方法:

1
2
3
4
5
6
val header = RequestHeader.parse(receive.payload)
val context = new RequestContext(header, receive.source, channel.socketAddress,
channel.principal, listenerName, securityProtocol)
val req = new RequestChannel.Request(processor = id, context = context,
startTimeNanos = time.nanoseconds, memoryPool, receive.payload, requestChannel.metrics)
requestChannel.sendRequest(req)

sendRequest()方法的实现:

1
2
3
4
// 发送待处理的请求, requestQueue 有容量上限, 由 queue.max.requests 配置, 若达到了上限则会阻塞。
def sendRequest(request: RequestChannel.Request) {
requestQueue.put(request)
}

“发送”只是将请求放到了内部的请求队列中,而出队方法是在server.KafkaRequestHandler中调用的,不属于网络层的事情,暂时不管。因此看看Request类型的构造,传入了headercontext

请求头的解析

1
2
3
4
5
6
7
8
9
10
11
12
13
14
public static RequestHeader parse(ByteBuffer buffer) {
try {
// 前2个字节为 Api Key, 代表请求的类型
short apiKey = buffer.getShort();
// 后2个字节为 Api Version, 即客户端使用的API版本
short apiVersion = buffer.getShort();
// 通过上述字段创建 Schema 对象, 即完整的消息头
Schema schema = schema(apiKey, apiVersion);
// ByteBuffer.getXXX() 会修改内部偏移量, 因此需要将偏移量重置为最开始以便从头读取 buffer
// 从头读取 buffer, 进而用 scheme.read() 构造请求头
buffer.rewind();
return new RequestHeader(schema.read(buffer));
} // 异常处理(略)
}

Api Key的类型参考Api Key,消息协议类型参考消息协议

1
2
3
4
5
Request Header => api_key api_version correlation_id client_id 
api_key => INT16
api_version => INT16
correlation_id => INT32
client_id => NULLABLE_STRING

这个头部即Schema类,其read()方法会把后面的correlation id和client id给读入,构造消息头。

请求上下文的构造

1
2
val context = new RequestContext(header, receive.source, channel.socketAddress,  channel.principal,
listenerName, securityProtocol)

其实就是简单地将对应参数赋值给内部字段:

1
2
3
4
5
6
public final RequestHeader header;  // 消息头
public final String connectionId; // 连接id,包含本地和远程的地址和表示连接的index
public final InetAddress clientAddress; // 客户端地址
public final KafkaPrincipal principal; // Channel的principal字段,用于信息认证
public final ListenerName listenerName; // 配置 listeners 的名字部分(比如PLAINTEXT)
public final SecurityProtocol securityProtocol; // 安全协议, 根据listenerName解析的

消息头上一小节刚看完,连接id也是阅读源码至今一直见到的用于标识一条TCP连接的字符串,最后2个字段均为解析listener配置时解析出的EndPoint类的字段。

请求对象的创建

RequestChannel.Request字段比较多就不一一解释了(很多都是metric相关的),核心是请求body(0.10版本是字段现在是方法):

1
2
3
4
5
6
7
def body[T <: AbstractRequest](implicit classTag: ClassTag[T], nn: NotNothing[T]): T = {
bodyAndSize.request match {
case r: T => r
case r =>
throw new ClassCastException(s"Expected request with type ${classTag.runtimeClass}, but found ${r.getClass}")
}
}

该方法仅仅是检查请求类型T是否合法,若不合法则抛出异常。

关键部分是bodyAndSize进行类型匹配,该字段初始化:

1
private val bodyAndSize: RequestAndSize = context.parseRequest(buffer)

context解析请求的方法:

1
2
3
4
5
6
7
8
9
10
11
12
13
14
15
16
17
18
19
public RequestAndSize parseRequest(ByteBuffer buffer) {
if (isUnsupportedApiVersionsRequest()) {
// 未支持的 ApiVersion 被视为v0请求并且不被处理
ApiVersionsRequest apiVersionsRequest = new ApiVersionsRequest((short) 0, header.apiVersion());
return new RequestAndSize(apiVersionsRequest, 0);
} else {
ApiKeys apiKey = header.apiKey();
try {
short apiVersion = header.apiVersion();
// 根据API版本将字节缓存解析成Struct的各个字段
Struct struct = apiKey.parseRequest(apiVersion, buffer);
// 根据请求类型/API版本/Struct字段创建实际的请求类型
AbstractRequest body = AbstractRequest.parseRequest(apiKey, apiVersion, struct);
return new RequestAndSize(body, struct.sizeOf());
} catch (Throwable ex) {
// 异常处理(略)
}
}
}
1
2
3
4
5
6
7
8
9
10
11
12
// 类 AbstractRequest 的方法
public static AbstractRequest parseRequest(ApiKeys apiKey, short apiVersion, Struct struct) {
switch (apiKey) {
case PRODUCE:
return new ProduceRequest(struct, apiVersion);
case FETCH:
return new FetchRequest(struct, apiVersion);
// 其他类型的请求...(略)
default:
// 异常处理(略)
}
}

这部分代码都是Java实现的,为了能根据不同请求类型/API版本得到对应的请求类型的示例,实现得较为复杂,细节也不深入去看,总之,在Kafka中可以像这样调用body()方法得到实际的请求对象:

1
2
// 将请求的 ByteBuffer 解析成 MetadataRequest 对象
val metadataRequest = request.body[MetadataRequest]

取出请求

之前介绍了Processor仅仅是将请求加入阻塞队列requestQueue中,那么何时取出呢?找到其poll()方法的调用处:

1
2
3
// 取得下个请求, 或者阻塞直到超时
def receiveRequest(timeout: Long): RequestChannel.BaseRequest =
requestQueue.poll(timeout, TimeUnit.MILLISECONDS)

再看看上述方法的调用处:

1
2
3
4
5
6
7
8
9
10
11
12
13
14
15
16
// 类 KafkaRequestHandler 的方法
def run() {
while (!stopped) {
// ...
val req = requestChannel.receiveRequest(300) // 300ms超时
// ...
req match {
case RequestChannel.ShutdownRequest =>
// ...
case request: RequestChannel.Request =>
// ...
case null => // continue
}
}
// ...
}

由于是API层的代码,所以略去了其他代码,只保留了req相关的。可以看到请求Handler线程会反复地从请求队列中取出请求,然后根据请求地类型进行不同处理。

多线程取出请求安全吗?

由于ArrayBlockingQueue是线程安全的,所以多个Handler线程从中取出请求是线程安全的。另一方面,关于顺序性,即来自同一个客户端的多个请求,必须保证取出的顺序也一致。《Apache Kafka源码剖析》书上给出了解释:Processor.run()方法通过多处注册/取消 读/写事件 来保证每个连接上只有一个请求和一个对应的响应来实现的。

具体而言,可以回顾我上一篇源码分析中Processor的部分:

  1. processCompletedReceives()中,一旦接收到完整的请求req,在调用sendRequest(req)后会取消监听该Channel的读事件;
  2. processCompleteSends()中,只有当响应成功返回客户端(将响应从缓存的inflightResponses移除)后,才会重新注册该Channel的读事件;
  3. processNewResponses()中判断请求类型是SendAction时,会注册Channel的写事件;
  4. poll()中向底层socket发送数据时,如果判断数据完毕,则会取消注册Channel的写事件。

处理响应

Processor自己维护了响应队列,并在processNewResponses()中调用dequeueResponse()方法依次出队, 那么,可以找到其对应方法enqueueResponse()的调用处:

1
2
3
4
5
6
7
8
9
10
11
def sendResponse(response: RequestChannel.Response) {
if (isTraceEnabled) {
// 判断响应类型并打印日志(略)
}

val processor = processors.get(response.processor)
// 如果 processor 已经关闭了, 可能会被移出 processors (此时返回null), 因此直接丢掉响应
if (processor != null) {
processor.enqueueResponse(response)
}
}

值得注意的是这里对processor != null的判断,Kafka 1.1.0的SocketServer支持resizeThreadPoll()方法来改变网络线程数量(也就是Acceptor对应Processor的数量),如果网络线程数减少的话,那么多出的Processor会调用shutdown()方法关闭,并通过connectionId将其从AcceptorRequestChannel中的processors字段移除。

继续找到该方法的调用处,位于KafkaApissendResponse()方法中:

1
2
3
4
5
6
7
8
9
10
11
12
13
14
private def sendResponse(request: RequestChannel.Request, responseOpt: Option[AbstractResponse]): Unit = {
// 更新metrics(略)

responseOpt match {
case Some(response) =>
val responseSend = request.context.buildResponse(response)
val responseString =
if (RequestChannel.isRequestLoggingEnabled) Some(response.toString(request.context.apiVersion))
else None
requestChannel.sendResponse(new RequestChannel.Response(request, Some(responseSend), SendAction, responseString))
case None =>
requestChannel.sendResponse(new RequestChannel.Response(request, None, NoOpAction, None))
}
}

此时RequestChannel只是将响应转发给了Processor,它本身并不维护响应队列(在0.10.0.1版本中则是维护了多个响应队列),真正维护响应队列的是Processor本身。

总结

关于Kafka网络层的阅读至此就告一段落,不得不说但作为Kafka的基础设施的Java NIO实现的部分更为复杂(KafkaChannelKafkaSelector),但阅读源码不应太陷入细节(感觉我已经有些陷进去了……)。对于Kafka,最重要的还是它的业务层,也就是对Kafka协议的实现。

RequestChannel的作用很简单:

  • 维护请求队列,接收来自Processor的请求,并转发给KafkaRequestHandler进行处理;
  • KafkaApis获取响应,发送给Processor

加上文章开始总结的Acceptor/Processor,以及统筹全局的SocketServer,构成了Kafka的网络层,简单描述:

1
2
3
4
5
|             Network Layer                 |       API Layer        |
| Acceptor -> Processors <-> RequestChannel | -> KafkaRequestHandler |
| | <- KafkaApis |
| Client -> SocketChannel -> Acceptor | |
| Client <-> KafkaChannel <-> Processor | |

可以发现不管是什么Channel,都是起到了连接的作用。Acceptor通过最简单的SocketChannel与监听套接字连接,监听连接事件,并将接受的连接转发给Processor,之后Processor通过比较复杂的KafkaChannel与客户端连接,监听读/写事件并和客户端进行数据的交互。

数据分为来自客户端的请求和来自服务端的响应,Processor不负责这部分,而是通过RequestChannel将请求发送给KafkaRequestHandler,再从RequestChannel接收响应。

问题来了,而实际发送响应给RequestChannel的却是KafkaApis,因此请求=>响应的过程是由它们共同完成的,也就是接下来要阅读的API层。

Kafka源码阅读02: 网络层阅读之Acceptor和Processor

AbstractServerThread

AcceptorProcessor的抽象基类,封装了一些辅助的变量和方法(这里重新组织了下代码顺序):

1
2
3
4
5
6
7
8
9
10
11
12
13
14
15
16
17
18
19
20
21
22
23
24
25
26
27
28
29
30
31
32
33
34
35
36
37
38
private val startupLatch = new CountDownLatch(1)
@volatile private var shutdownLatch = new CountDownLatch(0)

private val alive = new AtomicBoolean(true)
protected def isRunning: Boolean = alive.get

def shutdown(): Unit = {
// 如果线程仍在运行, 则将 alive 置为true表示线程之后会关闭, 然后调用抽象方法 wakeup()
if (alive.getAndSet(false))
wakeup()
shutdownLatch.await()
}

// 等待线程完全启动
def awaitStartup(): Unit = startupLatch.await

// 标识线程已经启动, 这样就可以等待停止操作了, 因此将 shutdownLatch 指向倒计时为1的对象
// 这样做是为了防止启动时抛出异常, 比如绑定正在使用的地址, 此时应该在处理异常之后仍然能 shutdown,
// 此时 shutdownComplete 的调用会因为异常而被跳过, 如果计数初始化为1会一直阻塞
protected def startupComplete(): Unit = {
// Replace the open latch with
shutdownLatch = new CountDownLatch(1)
startupLatch.countDown()
}

// 标识线程已经关闭
protected def shutdownComplete(): Unit = shutdownLatch.countDown()

def close(channel: SocketChannel): Unit = {
if (channel != null) {
debug("Closing connection from " + channel.socket.getRemoteSocketAddress())
// 减少 channel 对应地址的连接计数
connectionQuotas.dec(channel.socket.getInetAddress)
// 关闭 socket 连接以及 channel 本身, 吞下异常, 也就是说关闭出错不是什么严重错误, 写入日志以供分析就行
CoreUtils.swallow(channel.socket().close(), this, Level.ERROR)
CoreUtils.swallow(channel.close(), this, Level.ERROR)
}
}

Acceptor.run()

由于循环嵌套还是有点深的,先忽略对Channels的处理部分

1
2
3
4
5
6
7
8
9
10
11
12
13
14
15
16
17
18
19
20
21
22
23
24
25
26
27
28
29
30
31
32
33
def run() {
serverChannel.register(nioSelector, SelectionKey.OP_ACCEPT) // 注册OP_ACCEPT事件
// 标识启动完成, 之后 acceptor.awaitStartup() 才会返回, 回顾 createAcceptorAndProcessors()
// 也就是说 Server 启动时, 必须等到 acceptor 注册 OP_ACCEPT 事件后才会执行后续步骤:
// 将acceptor加入acceptors, addProcessors, 创建下个acceptor ...
startupComplete()
try {
var currentProcessor = 0 // 记录当前processor的id
while (isRunning) {
try {
// 轮询Selector直到有channels准备好I/O, 或者超时(500ms)
val ready = nioSelector.select(500)
if (ready > 0) { // 有ready个channels准备好I/O
// TODO: 处理准备好I/O的channels
} // else: ready <= 0
}
catch {
// 假设有特定的channel在select时出错, 或者收到bad request, 我们不想要让其他channels受到影响
// 因此遇到异常只需要打印错误即可。
// 但是scala会通过ControlThrowable来进行流程控制, 所以此时需要继续将异常往上抛(这是安全的)
// 在scala 2.13中可以用 case NonFatal(e) 来避免ControlThrowable被捕获
case e: ControlThrowable => throw e
case e: Throwable => error("Error occurred", e)
}
}
} finally {
// Acceptor线程结束后的清理工作
debug("Closing server socket and selector.")
CoreUtils.swallow(serverChannel.close(), this, Level.ERROR)
CoreUtils.swallow(nioSelector.close(), this, Level.ERROR)
shutdownComplete()
}
}

外层try-finally块没有catch,也就是说一切异常都在while循环体内进行处理,循环体内则是一个大的try-catch,注意重抛ControlThrowable的手法,可以参考Scala 2.13 ControlThrowableScala 2.12 ControlThrowable

Selector的处理和Linux的epoll_wait如出一辙,所以这里还是很熟悉的,不同的是没有处理ready <= 0的情况,接口文档里写的是

@return The number of keys, possibly zero, whose ready-operation sets were update

select()方法不会返回负值,像epoll_wait返回-1的情况,Selector是直接抛出异常了,文档里也写了3种异常:

  • IOException: If an I/O error occurs;
  • ClosedSelectorException: If this selector is closed;
  • IllegalArgumentException: If the value of the timeout argument is negative.

接下来看ready > 0时的代码,也是核心的处理逻辑:

1
2
3
4
5
6
7
8
9
10
11
12
13
14
15
16
17
18
19
20
try {
// 遍历所有的key, 类型为SelectionKey
val key = iter.next
iter.remove() // 从集合中移除该key, 防止
if (key.isAcceptable) { // 该key的channel可以接受新的socket连接
// round robin算法, 将连接均衡分配给计算出的下标对应的processor
// 比如3个processors, 接收了7个连接, 则分配的processor下标依次为: 0,1,2,0,1,2,0,1
val processor = synchronized {
currentProcessor = currentProcessor % processors.size
processors(currentProcessor)
}
accept(key, processor)
} else
throw new IllegalStateException("Unrecognized key state for acceptor thread.")

// round robin算法, 迭代
currentProcessor = currentProcessor + 1
} catch { // 遍历keys及处理每个key时的异常在此打印
case e: Throwable => error("Error while accepting connection", e)
}

思路很简单,就是用round robin算法简单做下负载均衡,调用accept()方法将key对应的连接分配给指定processor,因此核心其实是accept()方法。

PS:一个细节,外层catch处理了ControlThrowable,而内层catch并没处理,因为该异常是实现流程控制的,在迭代器到达末尾时才会抛出该异常,所以迭代循环中不会抛出该异常。另一个细节,这里每次迭代都把迭代器移除,这里大概是Java不会像C++一样,对象销毁的时候自动析构吧,而且Jave的Set移除迭代器之后不影响继续遍历。

看看accept()的实现(删掉了日志语句):

1
2
3
4
5
6
7
8
9
10
11
12
13
14
15
16
17
18
19
20
def accept(key: SelectionKey, processor: Processor) {
// key.channel()向下转型, 从抽象类 SelectableChannel 转型为派生类 ServerSocketChannel
val serverSocketChannel = key.channel().asInstanceOf[ServerSocketChannel]
val socketChannel = serverSocketChannel.accept() // socket accept, 返回表示连接的 SocketChannel
try {
// 将远程地址对应的连接数加1, 如果超过了配置的最大连接数限额, connectionQuotas会抛出 TooManyConnectionsException
connectionQuotas.inc(socketChannel.socket().getInetAddress)
socketChannel.configureBlocking(false) // socket设为非阻塞模式
socketChannel.socket().setTcpNoDelay(true) // socket设置TCP_NODELAY选项, 禁止Nagle算法
socketChannel.socket().setKeepAlive(true) // socket设置保活模式, 长时间没有发送心跳则发出RST包重置连接
// 配置的 socket.send.buffer.bytes 不为默认值, 则设置 SO_SNDBUF 选项重置发送缓冲区大小
if (sendBufferSize != Selectable.USE_DEFAULT_BUFFER_SIZE)
socketChannel.socket().setSendBufferSize(sendBufferSize)

processor.accept(socketChannel)
} catch {
case e: TooManyConnectionsException =>
close(socketChannel)
}
}

跟socket编程里一样的套路,只不过检查了同一个IP的最大连接数是否超限,并且给表示连接的socket设置了一些选项,然后实际上还是调用了Processor.accept()方法:

1
2
3
4
def accept(socketChannel: SocketChannel) {
newConnections.add(socketChannel)
wakeup()
}

这里就很简单了,把配置好的SocketChannel给加入Processor内部的并发队列newConnections中,其类型前一篇提过,是ConcurrentLinkedQueue

Acceptor.run()总结

抛开一些程序设计上的细节性知识,其实Acceptor线程的逻辑就是:

  1. 循环,从Selector中等待I/O事件就绪;
  2. 遍历所有的I/O事件,将isAcceptable的套接字取出,并调用socket的accept()取得新连接;
  3. 检查最大连接数,没超限的话进行一些socket选项配置;
  4. 将配置后的socket存入Processor的内部队列中。

可以看到Acceptor仅仅做了中介的作用,它是直接和客户端的连接请求打交道的,将成功的连接处理后传递给Processor,这样Processor就可以专心去处理网络数据的读写。

另一方面,我们可以看到Channel(在这里是SocketChannel类)其实就是对socket句柄的封装。

Processor.run()

1
2
3
4
5
6
7
8
9
10
11
12
13
14
15
16
17
18
19
20
21
22
23
24
25
override def run() {
startupComplete()
try {
while (isRunning) {
try {
configureNewConnections() // 处理缓存的新连接
processNewResponses() // 处理缓存的响应
poll() // 轮询, 从 Selector 中获取准备好I/O的事件
// 处理已完成的接收/发送以及断开的channels
processCompletedReceives()
processCompletedSends()
processDisconnected()
} catch {
// 这里吞下了所有异常, 因为让 processor 退出对 broker 的影响可能会很大, 但值得商榷的是,
// 是否存在需要让整个 broker 停止的异常。
// 通常抛出的异常都是和特定socket或者bad request相关的, 这些异常被捕获, 然后会被独立的方法处理, 因此不会在这里
// 被捕获, 所以可能这里只会看到 ControlThrowable (仅仅是可见, 没有地方会抛出)
case e: Throwable => processException("Processor got uncaught exception.", e)
}
}
} finally {
// 将异常信息写入日志(略)
shutdownComplete()
}
}

只用照着try作用域内的方法一个个地看下来就行。

1. configureNewConnections

1
2
3
4
5
6
7
8
9
10
11
12
13
14
15
16
17
private def configureNewConnections() {
while (!newConnections.isEmpty) {
// newConnections的SocketChannel依次出队
val channel = newConnections.poll()
try {
// 调用链: selector.registerChannel => selector.buildAndAttachKafkaChannel => channelBuilder.buildChannel()
// channel 会注册 OP_READ 事件(返回 SelectionKey)到 selector 上, 然后和 connectionId, SelectionKey 一起构造
// KafkaChannel 对象, 以 connectionId 作为key组成键值对加入 selector.channels 中
selector.register(connectionId(channel.socket), channel)
} catch {
// 捕获所有异常, 关闭 对应的socket防止socket泄漏
case e: Throwable =>
close(channel)
// 将异常信息写入日志(略)
}
}
}

可见Acceptor仅仅将表示连接的SocketChannel交给Processor,而Processor则会为其注册读事件,同时交给selector管理时会将其包装为KafkaChannel,这个包装过程是由ChannelBuilder接口完成的,而接口指向的实际对象是在Processor.createSelector()ChannelBuilders.serverChannelBuilder()方法创建的,对PLAINTEXT协议,即PlaintextChannelBuilder,其buildChannel()方法的调用和实现依次为:

1
2
3
4
5
6
// id: SocketChannel.connectionId
// key: SocketChannel.register() 返回的 SelectionKey
// maxReceiveSize: config.socketRequestMaxBytes, 即配置"socket.request.max.bytes"
// memoryPool: SocketServer.memoryPool
KafkaChannel channel = channelBuilder.buildChannel(id, key, maxReceiveSize, memoryPool);
key.attach(channel); // key原本是attach之前的SocketChannel的, 现在改变attach的对象
1
2
3
4
5
6
7
8
9
10
11
@Override
public KafkaChannel buildChannel(String id, SelectionKey key, int maxReceiveSize, MemoryPool memoryPool) throws KafkaException {
try {
PlaintextTransportLayer transportLayer = new PlaintextTransportLayer(key);
PlaintextAuthenticator authenticator = new PlaintextAuthenticator(configs, transportLayer);
return new KafkaChannel(id, transportLayer, authenticator, maxReceiveSize,
memoryPool != null ? memoryPool : MemoryPool.NONE);
} catch (Exception e) {
// 异常处理(略)
}
}
1
2
3
4
public PlaintextTransportLayer(SelectionKey key) throws IOException {
this.key = key;
this.socketChannel = (SocketChannel) key.channel();
}

可以发现keychannel: SocketChannel被存到了KafkaChannel.transportLayer字段中,因此在后面的源码中,给KafkaChannel注册和取消读/写事件到Selector上时是使用transportLayeraddInterestOps()removeInterestOps()方法:

1
2
3
4
5
6
7
8
9
@Override
public void addInterestOps(int ops) {
key.interestOps(key.interestOps() | ops);
}

@Override
public void removeInterestOps(int ops) {
key.interestOps(key.interestOps() & ~ops);

其实也就是调用了SelectionKeyinterestOps()方法,不过包装了位运算|&~来表示添加和移除。

2. processNewResponses

1
2
3
4
5
6
7
8
9
10
11
12
13
14
15
16
17
18
19
20
21
22
23
24
25
26
27
28
29
30
31
32
33
private def processNewResponses() {
var curr: RequestChannel.Response = null
while ({curr = dequeueResponse(); curr != null}) {
// 将响应从 responseQueue 中依次出队, 这里取得 connectionId 作为 channelId
val channelId = curr.request.context.connectionId
try {
// 根据响应的类型进行不同操作
curr.responseAction match {
case RequestChannel.NoOpAction =>
// 无操作: 无需发送响应给客户端, 因此需要读取更多请求到服务端的socket buffer中
// 调用链: selector.unmute() => channel.unmute()
// 会将 channel 从 selector.explicitlyMutedChannels 中移除,
// 如果该channel处于连接状态, 会在 channel.transportLayer 注册 OP_READ 事件。
updateRequestMetrics(curr)
trace("Socket server received empty response to send, registering for read: " + curr)
openOrClosingChannel(channelId).foreach(c => selector.unmute(c.id))
case RequestChannel.SendAction =>
// 发送: 调用链为 sendResponse() => selector.send() => channel.setSend()
// 将响应加入 inflightResponses 中, 并在 channel.transportLayer 注册 OP_WRITE 事件
val responseSend = curr.responseSend.getOrElse(
throw new IllegalStateException(s"responseSend must be defined for SendAction, response: $curr"))
sendResponse(curr, responseSend)
case RequestChannel.CloseConnectionAction =>
// 关闭连接: 关闭channel
updateRequestMetrics(curr)
trace("Closing socket connection actively according to the response code.")
close(channelId)
}
} catch {
// 将异常信息写入日志(略)
}
}
}

可以看到,Processor仅仅是对缓存在responseQueue中的响应进行处理,但是从请求到响应的转换并不是它的工作,查找了responseQueue的使用地方,可以看到实际上响应是由RequestChannel.sendResponse()方法发送过来的,更上一层,是KafkaApis.sendResponse()方法调用该方法,因此实际上是KafkaApis(位于kafka.server包内)完成对请求的处理。

至于updateRequestMetrics()方法和异常处理的部分我们不再关心。

3. poll

1
2
3
4
5
6
7
8
9
private def poll() {
// 轮询300ms, 会将读取的请求/发送的响应/断开的连接,放入 selector 的 completeReceives/completedSends/disconnected
try selector.poll(300)
catch {
case e @ (_: IllegalStateException | _: IOException) =>
// 不会重抛异常, 这样这次轮询的所有完成的 sends/receives/connections/disconnections 事件都会被处理
error(s"Processor $id poll failed due to illegal state or IO exception")
}
}

关键是selector.poll()方法:

1
2
3
4
5
6
7
8
9
10
11
12
13
14
15
16
17
18
19
20
21
22
23
24
25
26
27
28
29
30
31
32
33
34
35
36
37
38
39
40
41
42
43
44
45
46
47
48
49
50
51
52
53
54
55
56
57
58
59
60
61
62
63
64
65
66
67
@Override
public void poll(long timeout) throws IOException {
if (timeout < 0) // 检查参数合法性
throw new IllegalArgumentException("timeout should be >= 0");

boolean madeReadProgressLastCall = madeReadProgressLastPoll;
clear(); // 清理前1次 poll() 中设置的一些字段 (理应在此2次 poll() 之间对它们全部进行处理)

boolean dataInBuffers = !keysWithBufferedRead.isEmpty();

// 在以下情形时将timeout置为0 (代表已经有一些Channel I/O就绪了, select()会立刻返回)
// 1. 已经有一些接收数据的 Channel 在上一次 poll() 中读了一些数据;
// 2. 有可连接但暂为完成连接的 Channels;
// 3. 上次有 Channel 进行了 read() 操作, 并且 Channel 本身缓存了数据.
// 最后一种情况比较特殊, 它发生的场景是某些 Channels 有数据在中间缓冲区中但却无法读取(比如因为内存不足)
if (hasStagedReceives() || !immediatelyConnectedKeys.isEmpty() || (madeReadProgressLastCall && dataInBuffers))
timeout = 0;

// 若之前内存池内存耗尽, 而现在又可用了, 将一些因为内存压力而暂时取消读事件的 Channel 重新注册读事件
if (!memoryPool.isOutOfMemory() && outOfMemory) {
log.trace("Broker no longer low on memory - unmuting incoming sockets");
for (KafkaChannel channel : channels.values()) {
if (channel.isInMutableState() && !explicitlyMutedChannels.contains(channel)) {
channel.unmute();
}
}
outOfMemory = false;
}

// 检查 I/O就绪 的keys, 记录 select() 用时
long startSelect = time.nanoseconds();
int numReadyKeys = select(timeout);
long endSelect = time.nanoseconds();
this.sensors.selectTime.record(endSelect - startSelect, time.milliseconds());

// 1. 存在 I/O就绪 的Channels; 2和3 参见之前将 timeout = 0 部分的注释
if (numReadyKeys > 0 || !immediatelyConnectedKeys.isEmpty() || dataInBuffers) {
Set<SelectionKey> readyKeys = this.nioSelector.selectedKeys();

// Poll 有缓存数据的 Channels (但不Poll底层socket有缓存数据的Channels)
if (dataInBuffers) {
keysWithBufferedRead.removeAll(readyKeys); //so no channel gets polled twice
Set<SelectionKey> toPoll = keysWithBufferedRead;
keysWithBufferedRead = new HashSet<>(); //poll() calls will repopulate if needed
pollSelectionKeys(toPoll, false, endSelect);
}

// Poll 底层 socket 有缓存数据的 Channels
pollSelectionKeys(readyKeys, false, endSelect);
readyKeys.clear();

// Poll 待连接的 Channels
pollSelectionKeys(immediatelyConnectedKeys, true, endSelect);
immediatelyConnectedKeys.clear();
} else {
madeReadProgressLastPoll = true; //no work is also "progress"
}

long endIo = time.nanoseconds();
this.sensors.ioTime.record(endIo - endSelect, time.milliseconds());

// 利用 select() 结束时刻保证我们不会关闭刚刚传进 pollSelectionKeys() 的连接 (避免将其识别未过期连接)
maybeCloseOldestConnection(endSelect);

// 在关闭过期连接后, 将完成接收的 Channels 加入 completedReceives.
addToCompletedReceives();
}

这部分继续深究的话比较复杂,Kafka在这方面考虑了不少,上述分析中对一些字段也只是简单地提了下,到此为止。总之,最重要的是直到poll()会填充Selector内部维护的已完成接收/已完成发送/已断开Channel,以便之后处理。

PS:在处理完成的发送时,在调用send()向socket写入数据的同时取消监听对应ChannelOP_WRITE事件:

1
2
3
4
5
6
7
8
9
// 类 KafkaChannel
// 调用链: Selector.PollSelectionKeys() => write() => send()
private boolean send(Send send) throws IOException {
send.writeTo(transportLayer);
if (send.completed())
transportLayer.removeInterestOps(SelectionKey.OP_WRITE);

return send.completed();
}

4. processCompletedReceives

1
2
3
4
5
6
7
8
9
10
11
12
13
14
15
16
17
18
19
20
21
22
23
24
25
26
27
28
29
private def processCompletedReceives() {
// 遍历所有完成接收的 NetworkService, 具体实现在 selector.poll() 方法中, 最后会调用 addToCompletedReceives()
// 如果 channel 不在 explicitlyMutedChannels 中 (即调用了unmute()方法), 则会将 channel 对应的 NetworkService 队列
// 弹出队首并加入 completedReceives 中。
selector.completedReceives.asScala.foreach { receive =>
try {
// NetworkServer 的 source 字段记录了连接channel的 connectionId
openOrClosingChannel(receive.source) match {
case Some(channel) =>
// 解析 payload (接收到的ByteBuffer)的头部
val header = RequestHeader.parse(receive.payload)
// 将其与 channel 的会话层信息封装成 RequestContext
val context = new RequestContext(header, receive.source, channel.socketAddress,
channel.principal, listenerName, securityProtocol)
// 进一步将上述信息封装成 Request 对象
val req = new RequestChannel.Request(processor = id, context = context,
startTimeNanos = time.nanoseconds, memoryPool, receive.payload, requestChannel.metrics)
// 这里仅仅是将 req 放入 requestChannel 的内部队列 requestQueue
requestChannel.sendRequest(req)
// 取消监听该channel的 OP_READ 事件, 并添加到 explicitlyMutedChannels
selector.mute(receive.source)
case None =>
// 抛出异常(略)
}
} catch {
// 异常处理(略)
}
}
}

4. processCompleteSends

1
2
3
4
5
6
7
8
9
10
11
12
13
14
15
private def processCompletedSends() {
// 遍历所有完成发送的 NetworkService, 具体实现在 selector.poll() 方法中
selector.completedSends.asScala.foreach { send =>
try {
// 将该网络地址的响应从 inflightResponses 中移除
val resp = inflightResponses.remove(send.destination).getOrElse {
throw new IllegalStateException(s"Send for ${send.destination} completed, but not in `inflightResponses`")
}
updateRequestMetrics(resp)
// 将对应的 channel 从 explicitlyMutedChannels 中移除, 并且如果未断开连接, 则注册 OP_READ 事件
selector.unmute(send.destination)
} catch {
// 异常处理(略)
}
}

5. processDisconnected

1
2
3
4
5
6
7
8
9
10
11
12
13
14
15
16
17
18
private def processDisconnected() {
// 遍历所有断开连接的channel的 connectionId, 具体实现在 selector.poll() 方法中
selector.disconnected.keySet.asScala.foreach { connectionId =>
try {
// 从 connectionId 中取得网络地址信息
val remoteHost = ConnectionId.fromString(connectionId).getOrElse {
throw new IllegalStateException(s"connectionId has unexpected format: $connectionId")
}.remoteHost
// 将断开连接的网络地址的响应从 inflightResponses 中移除
inflightResponses.remove(connectionId).foreach(updateRequestMetrics)
// the channel has been closed by the selector but the quotas still need to be updated
// 更新 quotas 的信息, 即将该网络地址上的连接数减1
connectionQuotas.dec(InetAddress.getByName(remoteHost))
} catch {
// 异常处理(略)
}
}
}

Processor.run()总结

Processor使用了Kafka自己实现的Selector(别名为KSelector),比Acceptor使用的NIO默认的Selector(别名为NSelector)有更多的功能,因为Processor要维护监听socket的读/写事件状态,即OP_READOP_WRITE

一些具体的实现在org.apache.kafka.commonnetwork包和request包中(Java实现),这里暂时不细看。

归结其流程为:

  1. 从将Acceptor收到的新连接全部注册OP_READ事件,因为Kafka服务端不主动向客户端发送请求,只被动响应客户端的请求;
  2. 根据响应类型处理缓存的响应:NoOpAction=>重新注册Channel的读事件,SendAction=>注册Channel的写事件,将响应缓存,并交由RequestChannel发送,CloseConnectionAction=>关闭Channel
  3. 轮询Selector得到就绪的I/O事件(可读/可写/断开);
  4. 对所有完成接收的数据(请求),封装后给RequestChannel发送;
  5. 对所有完成发送的数据(响应),从缓存中移除,并重新监听对应Channel的读事件;
  6. 对所有断开的连接,更新connectionQuotas维护的网络地址=>连接数的映射。

Processor本身只是做完成读/写/断开三种事件的处理,发送和接收实际上都是通过RequestChannel。至于Processor是由SocketServer.newProcessor()方法创建的,其内部的requestChannel字段就是SocketServer的同名字段。

因此,接下来就是阅读RequestChannel

Kafka源码阅读01: 网络层阅读之服务器的启动

前言

今天正式开始阅读Kafka源码,作为阅读笔记的第一篇,先简单地介绍下背景。

阅读的Kafka版本是1.1.0,服务端源码在core.main.scala.kafka目录下,该目录下的源码文件仅有Kafka.scala,也就是服务端的启动入口,其他的若干个模块都阻止在各子目录下,这里首先阅读的是网络层,也就是network子目录下的代码。

阅读思路是直接看公用方法,然后再给一些逻辑以及用到的字段作注释,否则单看某些字段不看语境也不知道做什么。注释里会给英文两边加空格,逗号也使用英文逗号,方便vim快捷键按词前进/后退。

使用Intellij Idea阅读的,之前用得比较少,也很折腾了下配置过程,记录一些阅读源码的方法:

  • 光标选中+单击鼠标左键:跳转至变量/函数定义处;
  • Navigate菜单栏的Back和Forward,快捷键是Ctrl+Alt+Left/Right:后退/前进到前/后一次阅读的地方,一般时配合跳转功能回退;
  • 光标选中+鼠标右键,选择Find Usages,快捷键是Alt+Shift+F7:查看变量/函数所有使用的地方;
  • 快捷键Alt+F7:查看类的所有字段和方法。

对应我阅读C/C++源码时vim的Ctrl+JYCM)/Ctrl+]ctags)跳转,Ctrl+O回退,LeaderF查看类的字段和方法。之前vim一直没配置查找所有调用处的功能,一直是手动写个简单脚本用egrep在当前目录下递归搜关键词的……

不过IDE优点就是功能更大更全,上手新语言时直接使用,不必每接触一门语言旧学习怎么定制功能。

SocketServer

注释表明了它是一个NIO套接字服务器,其线程模型是:

  • 1个Acceptor线程处理新连接;
  • Acceptor有N个Processor线程,其中每个都有自己的Selector从套接字中读取请求;
  • M个Handler线程,处理请求,并将回应发给Processor线程用于写入。

SocketServer的主构造器有以下参数:

1
2
3
4
val config: KafkaConfig // 配置文件
val metric: Metrics // 度量指标
val time: Time // 对象创建时间
val credentialProvider: CredentialProvider // 证书提供者

混入了LoggingKafkaMetricsGroup特质,后者继承自前者,但并没重写info()等日志方法,而是将不同类型的metric(度量指标)给组织起来,提供了各种metric的工厂方法。

对于日志,设置了类相关的前缀表明broker id:

1
2
private val logContext = new LogContext(s"[SocketServer brokerId=${config.brokerId}] ")
this.logIdent = logContext.logPrefix

涉及到的一些字段,我添上了注释并按相关度整合了下:

1
2
3
4
5
6
7
8
9
10
11
12
13
14
15
16
17
18
19
20
21
// 每个ip的最大连接数, 配置: max.connections.per.ip
private val maxConnectionsPerIp = config.maxConnectionsPerIp
// 指定ip的最大连接数, 会覆盖 maxConnectionsPerIp, 配置: max.connections.per.ip.overrides
private val maxConnectionsPerIpOverrides = config.maxConnectionsPerIpOverrides
// 由以上参数创建
private var connectionQuotas: ConnectionQuotas = _

// 请求队列的最大容量, 配置: queued.max.requests
private val maxQueuedRequests = config.queuedMaxRequests
// 内部维护了一个请求队列
val requestChannel = new RequestChannel(maxQueuedRequests)

// 每个 Processor 拥有自己的 Selector, 用于从连接中读取请求和写回响应
// Processor 会将请求发送至 requestChannel, 会从 responseChannels 中读取响应
private val processors = new ConcurrentHashMap[Int, Processor]() // key: id
private var nextProcessorId = 0 // 递增作为每个 processor 的id

// key: EndPoint, 即配置 listeners 指定的 ip/port 以及其 SecurityProtocol (默认PLAINTEXT)
// 对每个绑定的 ip/port 都创建唯一对应的 Acceptor, 用于创建连接 Channel
// PS: 该字段在 network包 内可访问,实际上目前也就这个类会访问。
private[network] val acceptors = new ConcurrentHashMap[EndPoint, Acceptor]()

服务器启动源码分析

1
2
3
4
5
6
7
8
9
10
11
def startup() {
this.synchronized {
// connectionQuotas 用于限制IP的最大连接数
connectionQuotas = new ConnectionQuotas(maxConnectionsPerIp, maxConnectionsPerIpOverrides)
// 创建 Acceptors 和 Processors
createAcceptorAndProcessors(config.numNetworkThreads, config.listeners)
}

// 忽略了剩下的代码, 都是调用 KafkaMetricsGroup.newGauge 创建 Gauge对象,
// 用于测量某些指标, 比如Processor的平均闲置百分比/内存池可用大小/内存池占用大小
}

再看看 Acceptor 和 Processor 的创建:

1
2
3
4
5
6
7
8
9
10
11
12
13
14
15
16
17
18
19
20
private def createAcceptorAndProcessors(processorsPerListener: Int,
endpoints: Seq[EndPoint]): Unit = synchronized {

// socket内部缓冲区大小,底层可用C函数 setsockopt 设置 SO_SNDBUF/SO_RCVBUF
val sendBufferSize = config.socketSendBufferBytes // socket.send.buffer.bytes
val recvBufferSize = config.socketReceiveBufferBytes // socket.receive.buffer.bytes
val brokerId = config.brokerId // broker.id

endpoints.foreach { endpoint =>
val listenerName = endpoint.listenerName
val securityProtocol = endpoint.securityProtocol

val acceptor = new Acceptor(endpoint, sendBufferSize, recvBufferSize, brokerId, connectionQuotas)
KafkaThread.nonDaemon(s"kafka-socket-acceptor-$listenerName-$securityProtocol-${endpoint.port}", acceptor).start()
acceptor.awaitStartup() // 等待acceptor线程完全启动
acceptors.put(endpoint, acceptor) // 构建键值对 <EndPoint, Acceptor> 加入 acceptors
// 单个 Acceptor 对应 processorsPerListener(即numNetworkThreads)个 Processors
addProcessors(acceptor, endpoint, processorsPerListener)
}
}

对每个Acceptor,会创建多个Processor,类似地,也存入ConcurrentHashMap中:

1
2
3
4
5
6
7
8
9
10
11
12
13
14
15
16
17
18
19
20
private def addProcessors(acceptor: Acceptor, endpoint: EndPoint, newProcessorsPerListener: Int): Unit = synchronized {
val listenerName = endpoint.listenerName
val securityProtocol = endpoint.securityProtocol
val listenerProcessors = new ArrayBuffer[Processor]()

for (_ <- 0 until newProcessorsPerListener) {
val processor = newProcessor(nextProcessorId, connectionQuotas, listenerName, securityProtocol, memoryPool)
listenerProcessors += processor
// 内部调用了 putIfAbsent() 方法将其加入了 requestChannel 内部维护的 ConcurrentHashMap[Int, Processor],
// key为 processor.id, 使用 putIfAbsent() 方法是因为理论上 processer.id 是唯一的, 因此在插入重复的id时,
// 不应插入新对象, 而是仅仅返回一个非空 Processor 并根据返回值打印日志
requestChannel.addProcessor(processor)
// 仅在此递增 SocketServer 的 nextProcessId 字段,因此保证了对不同 Acceptor 的 Processors,
// 其 id 是不同的,因此每个 Processor 在 processors 字段中都对应唯一的 key
nextProcessorId += 1
}
listenerProcessors.foreach(p => processors.put(p.id, p))
// 启动 listenerProcessors 的所有 Processor 线程, 并将其添加到内部维护的 processor: ArrayBuffer[Processor] 中
acceptor.addProcessors(listenerProcessors)
}

RequestChannel/Acceptor/Processor的字段

从上述代码可知,重点是RequestChannel/Acceptor/Processor这3个类型,于是现在看看它们创建时除去传入构造器的参数外初始化的其他字段(依然忽略metrics相关的)。

首先是RequestChannel的字段:

1
2
3
4
// 创建了固定长度的请求队列,queueSize由 queued.max.requests 决定
private val requestQueue = new ArrayBlockingQueue[BaseRequest](queueSize)
// 之前已经提过,创建 Processors 时添加进的
private val processors = new ConcurrentHashMap[Int, Processor]()

此外,配置是使用kafka.server.KafkaConfig类实现的,默认配置在伴生对象kafka.server.Defaults中(比如默认的queueSize为500),并在KafkaConfig的伴生对象的configDef字段创建时加载。

再就是Acceptor的字段:

1
2
3
4
5
6
7
// NIO Selector, 用于注册 connect, read, write 等事件,并将事件分发给 Acceptor, Processors
private val nioSelector = NSelector.open()
// 服务通道, 绑定 EndPoint, 用于接收客户端的连接, 类型为 ServerSocketChannel
val serverChannel = openServerSocket(endPoint.host, endPoint.port)
// 之前提过的,保存每个 Acceptor 对应的 Processors, 没有存为映射, 因为 Acceptor 要将
// 连接均衡地分配给 Processors, 不涉及查询操作, 更多地需要遍历, 比如round-robin算法
private val processors = new ArrayBuffer[Processor]()

其中 NSelector 就是 Selector 的别名:

1
import java.nio.channels.{Selector => NSelector}

最后是Processor的字段:

1
2
3
4
5
6
7
8
9
10
11
12
13
14
15
16
17
18
// SocketChannel 的并发队列, 用于管理 Acceptor 分配的socket连接
private val newConnections = new ConcurrentLinkedQueue[SocketChannel]()
// ConnectionId 到 Response 的映射, 缓存待发送的响应
private val inflightResponses = mutable.Map[String, RequestChannel.Response]()
// 缓存产生的响应
private val responseQueue = new LinkedBlockingDeque[RequestChannel.Response]()

// 创建的是 kafka.common.network.Selector, 也就是自己实现的 Selector
private val selector = createSelector(
ChannelBuilders.serverChannelBuilder(listenerName,
listenerName == config.interBrokerListenerName,
securityProtocol,
config,
credentialProvider.credentialCache,
credentialProvider.tokenCache))

// 用于生成连接的 index, 类似 SocketServer 生成 Processor.id, 不过保证了 index 非负
private var nextConnectionIndex = 0

不得不说这里为何要使用 ConcurrentLinkedQueueLinkedBlockingDeque 还是不清楚,但还是先不要在意细节,注意这里保存了2份Response,一个只是临时缓存处理后的响应,另一个则是真正待发送的响应,因为用key记录了连接信息:

1
2
3
4
5
// 作为 inflightResponses 的key, 记录了本地地址/远程地址, 以及连接对应的索引
// 该索引是通过 nextConnectionIndex 自增生成的, 而且非负
private[network] case class ConnectionId(localHost: String, localPort: Int, remoteHost: String, remotePort: Int, index: Int) {
override def toString: String = s"$localHost:$localPort-$remoteHost:$remotePort-$index"
}

服务器启动总结

总结下来,启动SocketServer时其实就是根据配置参数创建了1个RequestChannel,M个Acceptor,M*N个Processor。其中M是监听地址的数量,N是num.network.thread配置的Acceptor对应的Processors的数量。

每个监听地址除了ip和port外,还有协议类型和名称,这些共同组成了EndPoint类。

  • SocketServer保存EndPointAcceptor的映射和Processor.idProcessor的映射;
  • requestChannel持有M*N个Processorid到其自身的映射;
  • 每个Acceptor持有1个Selector
  • 每个Acceptor持有1个监听EndPointServerSocketChannel
  • 每个Acceptor持有N个Processor组成的数组;
  • 每个 Processor 持有1个Selector(Kafka自己实现的Selectable接口);
  • 每个Processor持有一组socket连接;
  • acceptorsprocessors都启动了线程(供M*(N+1)个)构成了整个网络层的处理。

Kafka的网络层是使用Reactor模式的,使用了Java NIO,所有的socket读写都是非阻塞模式,具体框架可以参考《Apacha Kafka源码剖析》一书,我目前也是照着这本书的思路去看源码。

不过对Java NIO不熟悉,虽然看了眼核心还是分发事件的Selector(I/O多路复用),但是封装得比较好。抽空去看看。

网络层运转的核心还是AcceptorProcessor的线程函数,也就是这2个类的run()方法,也是接下来要读的部分。

为什么使用ConcurrentHashMap?

《Apacha Kafka源码剖析》书中使用的是Kafka 0.10.0.1版本,其中acceptorsprocessors的类型是:

1
2
private val processors = new Array[Processor](totalProcessorThreads)
private[network] val acceptors = mutable.Map[EndPoint, Acceptor]()

而1.1.0版本就都用ConcurrentHashMap来保存了,看源码时我也在想为什么不用数组去存processors,因为key就是从0到N-1。搜了下这个结构在Java 8用了不同于7的实现,抽空去看看。

然后看到了addListeners/removeListeners方法,前者根据新的Seq[EndPoint]重新创建acceptorsprocessors,后者则将指定的Seq[EndPoint]对应的Acceptoracceptors中删除。而这两个方法在0.10.0.1版本中没有,所以就能用固定长度的数组来保存processors,也能用不支持并发访问的mutable.Map来保存acceptors

不过还有个不明白的地方,看到直接访问acceptorsprocessors的都是SocketServer内部,而除了boundPort()方法和stopProcessingRequests()外,所在访问它们的方法都直接用synchronized关键字保护了,而boundPort()方法仅在xxxTest.scala中被调用了,这样的话使用ConcurrentHashMap是否必要?

链接选项RPATH以及在cmake和gcc中的使用

注:此文已作废,本文存在若干事实性错误以及误导,在最新一篇文章中将重新说明。


前言

毕业前帮师兄写框架程序时,以及最近折腾公司内部项目的编译,都遇到一些以前没有遇到的问题,这里简单地记一些。

本文要讲的也就是 rpath ,即 relative path 的缩写,最初遇到这个坑时是在写 cmake 时,直接 make 生成的程序能够链接到指定的动态库,但是 make install 之后发现就链接失效了。

示例项目

这里举个简单的例子来复现,目录结构为:

1
2
3
4
5
6
7
8
9
10
$ tree .
.
├── CMakeLists.txt
├── example
│   ├── CMakeLists.txt
│   └── main.c
└── src
├── CMakeLists.txt
├── foo.c
└── foo.h

代码组织方式是: src 目录为库目录,其源码会编译成动态库 libfoo.soexample 为示例目录,其源码会包含 src 目录的头文件,并链接到动态库 libfoo.so 。具体代码也不长,依次贴出:

./CMakeLists.txt

1
2
3
4
5
cmake_minimum_required(VERSION 3.5)
project(example C)
set(CMAKE_CFLAGS -g -Wall)
add_subdirectory(src)
add_subdirectory(example)

./src/CMakeLists.txt

1
2
add_library(foo SHARED foo.c)
install(TARGETS foo LIBRARY DESTINATION lib)

./src/foo.h

1
2
3
4
5
6
#ifndef FOO_H
#define FOO_H

void foo();

#endif // FOO_H

./src/foo.c

1
2
3
4
#include "foo.h"
#include <stdio.h>

void foo() { printf("foo\n"); }

./example/CMakeLists

1
2
3
4
add_executable(main main.c)
include_directories(../src)
target_link_libraries(main foo)
install(TARGETS main RUNTIME DESTINATION bin)

./example/main.c

1
2
3
4
5
6
#include "foo.h"

int main() {
foo();
return 0;
}

编译、安装及测试

老方法,新建一个临时目录用来存放中间文件,以下命令在项目根目录下执行,将动态库和可执行程序安装到根目录下的 libbin 目录,然后回到根目录:

1
2
3
mkdir build && cd build
cmake .. -DCMAKE_INSTALL_PREFIX=..
make && make install && cd ..

此时目录结构为:

1
2
3
4
5
6
7
8
9
10
11
12
13
14
$ tree . -I build
.
├── bin
│   └── main
├── CMakeLists.txt
├── example
│   ├── CMakeLists.txt
│   └── main.c
├── lib
│   └── libfoo.so
└── src
├── CMakeLists.txt
├── foo.c
└── foo.h

首先我们运行 build 目录下的可执行文件,并查看其连接的 libfoo.so 路径:

1
2
3
4
$ ./build/example/main 
foo
$ ldd ./build/example/main | grep foo
libfoo.so => /home/xyz/RPATH/build/src/libfoo.so (0x00007f5d41c23000)

这里 /home/xyz/RPATH 是我的项目根目录绝对路径,可以发现 make 生成的可执行文件,链接的是绝对路径,并且运行也没问题。但是再看看安装后的可执行文件和链接的库:

1
2
3
4
$ ./bin/main 
./bin/main: error while loading shared libraries: libfoo.so: cannot open shared object file: No such file or directory
$ ldd ./bin/main | grep foo
libfoo.so => not found

我们会发现可执行文件失去了链接,因此要运行 main ,必须手动将动态库添加到系统路径中:

1
2
$ LD_LIBRARY_PATH=./lib ./bin/main 
foo

问题在哪

这个问题最初出现在我帮师兄写的框架当中,当时也找到了stackoverflow上的讨论帖:cmake: “make install” does not link against libraries in Ubuntu

简单翻译下:

系统首先会在 /etc/ld.so.conf 文件配置的路径中寻找动态库(在我的系统上该文件记录的是 /etc/ld.so.conf.d 目录下的所有 *.conf 文件),如果找不到,则有以下4个选项:

  1. 将库安装到系统默认路径比如 /lib/usr/lib(但可能因为没有权限而无法实施);
  2. 编辑系统范围的搜索路径(同样可能因为没有权限而无法实施);
  3. 设置 LD_LIBRARY_PATH(就像我们上节末尾所做的,但它会覆盖系统路径,也就是说可能会优先选择自己的库而不是系统路径的同名库);
  4. 设置 RPATH,告诉可执行文件该到哪寻找它的库。

OK,现在来看问题的产生原因:RPATHmake install 后会被自动地清除。为什么会这样呢?因为 cmake 安装的可执行文件和动态库的相对路径,可能和 make 生成的不一样,因此无法自动记住。

cmake的解决方法

当然,cmake 本身也提供了解决方法,参见:RPATH handling

不想看官网的长篇大论的话,针对本文的示例,在项目根目录的 CMakeLists.txt 中添加:

1
2
set(CMAKE_INSTALL_RPATH "${CMAKE_INSTALL_PREFIX}/lib")
set(CMAKE_INSTALL_RPATH_USE_LINK_PATH TRUE)

make install 安装时可以看到如下提示信息:

1
2
-- Installing: /home/xyz/RPATH/bin/main
-- Set runtime path of "/home/xyz/RPATH/bin/main" to "/home/xyz/RPATH/lib"

这种方式还是设置的绝对路径,也就是 cmake 安装目录下的 lib 子目录,然后可以发现安装后的 main 成功链接到了 libfoo.so,并且改变 main 路径,仍然可以链接到 libfoo.so

1
2
3
4
5
$ ldd bin/main | grep foo
libfoo.so => /home/xyz/RPATH/lib/libfoo.so (0x00007f60818c2000)
$ mv bin/main .
$ ldd main | grep foo
libfoo.so => /home/xyz/RPATH/lib/libfoo.so (0x00007f6ff516f000)

类似地,我们可以把 CMAKE_INSTALL_RPATH 指定为相对路径 ../lib,但这样的话局限性比较大,也就是说必须保证动态库在 $PWD/../lib 下,比如按这种方式编译安装后:

1
2
3
4
5
$ ldd ./bin/main | grep foo
libfoo.so => not found
$ cd bin
$ ldd ./main | grep foo
libfoo.so => ../lib/libfoo.so (0x00007f12fe0c7000)

但这种方式也有个优点,也就是说哦,只要动态库在当前工作目录的相对路径 ../lib 下,就能链接到该动态库,此时可以写一个脚本,和 main 放在同一目录:

1
2
3
#!/bin/bash
SHELL_DIR=$(cd $(dirname $0) && echo $PWD)
cd $SHELL_DIR && ./main

第一行是取得脚本目录的绝对路径,第2行是进入该路径,这样只要动态库在可执行文件(以及运行脚本)的相对路径 ../lib 下,无论从哪个目录调用该脚本,都能成功使可执行文件链接到该动态库:

1
2
3
4
5
6
7
8
9
10
11
12
13
$ ls bin/
main run.sh
$ ls lib/
libfoo.so
$ ./bin/run.sh
foo
$ cd bin/ && ./run.sh && cd -
foo
/home/xyz/RPATH
$ mkdir temp
$ mv bin/ lib/ temp/
$ ./temp/bin/run.sh
foo

不过既然借助了辅助脚本了,实际上在脚本里手动设置 LD_LIBRARY_PATH 为相对路径看起来更简单一些。

GCC的解决方法

为什么说到这个呢?因为我最近在使用公司内部项目的时候,发现自己的测试代码一直出错,查看日志,竟然源码路径来自其他用户的个人目录。也就是说是其他用户编译了动态库,然后使用超级权限将其安装到了系统目录。

对于这种情况,可以用 LD_LIBRARY_PATH 覆盖,但是如果修改了目录后,每次都要重新设置 LD_LIBRARY_PATH,此时用 gcc 的链接选项就行了,还是对这个项目,手动用 gcc 进行编译:

1
2
3
4
5
$ cd src/
$ gcc -c -fPIC foo.c
$ gcc -shared foo.o -o libfoo.so
$ cd ../example/
$ gcc main.c -I../src -L../src -lfoo -Wl,-rpath=../src

注意,-Wl,-rpath 这个选项必不可少,它指定了 RPATH 的相对路径,为此,我将原来的 libfoo.so 放在系统目录 /lib64 下,然后修改 foo.c (打印 "new foo" 而不是 "foo")后编译成动态库放在 src 目录下,测试如下:

1
2
3
4
5
6
7
8
9
10
11
12
13
14
15
16
17
18
19
20
21
22
23
24
$ cd example/
$ gcc main.c -I../src -L../src -lfoo
$ ./a.out
foo
$ gcc main.c -I../src -L../src -lfoo -Wl,-rpath=../src
$ ./a.out
new foo
$ cd .. && mkdir temp && mv src/ example/ temp
$ tree temp/
temp/
├── example
│   ├── a.out
│   ├── CMakeLists.txt
│   └── main.c
└── src
├── CMakeLists.txt
├── foo.c
├── foo.h
├── foo.o
└── libfoo.so
$ ./temp/example/a.out
foo
$ cd temp/example/ && ./a.out
new foo

和刚才 cmake 设置 RPATH 的测试结果一样,只要当前工作目录满足和动态库所在目录的相对路径是 RPATH,那么运行可执行文件所链接到的动态库就是相对路径的动态库。

我的vim开发环境搭建(4): GDB升级8.0

0. 前言

因为CentOS 6的GDB版本太老,所以在调试我自己安装的高版本GCC编译的程序时,很多时候打印不出变量来,所以需要升级GDB。

之前在CentOS 6上下载GDB源码编译总是出问题,网上也搜不到解决原因,不过最后自己折腾出来原因了。问题关键在于configure阶段,正确的宏没有检测出来,导致条件编译出错,比如:

1
2
3
#ifdef HAVE_XXX
// 某些类型的定义或相应头文件的包含...
#endif

如果HAVE_XXX宏没有检测出来的话,本应该定义的类型就没有了。这既可能造成编译阶段找不到类型定义,也可能造成链接阶段找不到函数的定义(因为某些函数的参数是typedef别名或者宏)。

明白这一点后,只需要make时根据错误在对应代码中删除相应的#ifdef或者#ifndef块就行,这里以GDB 8.0的编译为例。

1. 工具和说明

有时候代码出错,提示某些类型或宏定义不存在。这时可以查找这些宏是在哪个文件中:

1
find . -name "*.h" | xargs grep -n "XXX"

有时候不在GDB源码目录下,而是在系统头文件中,比如B0就是termios.h中的定义,此时可以利用搜索引擎搜索,并YouCompleteMe的代码跳转功能来确认,有些头文件是sys/xxx.h而非xxx.h(旧版本的系统),这些GDB源码通过条件编译判断到底是包含哪个。

此外,跳转功能还是要结合ctags,YCM好用在于它是基于语义的分析,但是得设置包含路径,默认包含路径只有当前目录,如果直接包含子目录头文件而不给出子目录名(编译时-I指定子目录路径即可)。ctags无脑找标签,所以有时候直接包含子目录的头文件,即使不做设置也可以跳转。ctags只需要在源码目录下ctags -R .生成tags文件,之后Ctrl+]就可以跳转了。

一般提示xxx.c出错,先仔细看看对应的xxx.h头文件,是否因为条件编译导致某些类型定义找不到。如果该头文件找不到,就可能通过上面的方法找到类型定义处,基本上一大堆宏都是在config.h中。

另外,错误提示的文件目录为GDB源码解压后的gdb子目录。

2. 出错解决

2.1. 编译错误处理

In file included from inf-ptrace.c:27:0:
nat/gdb_ptrace.h:150:19: error: ‘PTRACE_TYPE_ARG1’ was not declared in this scope
ptrace ((PTRACE_TYPE_ARG1) request, pid, addr, data)

仅给出其中一处代表性错误。进入nat/gdb_ptrace.h可以看到这样的语句:

1
2
3
4
5
#ifdef HAVE_PTRACE_H
# include <ptrace.h>
#elif defined(HAVE_SYS_PTRACE_H)
# include <sys/ptrace.h>
#endif

我的系统上是sys/ptrace.h,那么明显条件编译出问题了,删掉#include <sys/ptrace.h>的另外4行即可。

类似地,去掉#ifndef HAVE_DECL_PTRACE。然后包含../config.h头文件(因为在gdb目录下,而gdb_ptrace.hgdb/nat目录下),这个头文件必须在sys/ptrace.h下方,因为相关地宏,因为其中定义地宏在后面地头文件中也可能用到。

修改后还有个错误

inf-ptrace.c: In function ‘void inf_ptrace_interrupt(target_ops*, ptid_t)’:
inf-ptrace.c:304:34: error: ‘inferior_process_group’ was not declared in this scope
kill (-inferior_process_group (), SIGINT);

利用ctags找到该函数定义在inflow.c中:

1
2
3
4
5
6
7
8
9
10
 93 #ifdef PROCESS_GROUP_TYPE
94
95 /* Return the process group of the current inferior. */
96
97 PROCESS_GROUP_TYPE
98 inferior_process_group (void)
99 {
100 return get_inflow_inferior_data (current_inferior ())->process_group;
101 }
102 #endif

嗯估计又是PROCESS_GROUP_TYPE找不到,该类型在inflow.h中定义,用条件编译宏包括起来了:

1
2
3
4
5
25 #ifdef HAVE_TERMIOS
26 # define PROCESS_GROUP_TYPE pid_t
27 #elif defined (HAVE_TERMIO) || defined (HAVE_SGTTY)
28 # define PROCESS_GROUP_TYPE int
29 #endif

原因是HAVE_TERMIOS没检测出来保。留第26行,其余4行删掉。可以看到上面包含了gdb_termios.h中(在gdb/common目录下),更根本的解决方法是在这个头文件中定义宏HAVE_TERMIOS。(也能解决后面其他和termios相关的问题)

下文就不详细给出错误信息和分析了,简单描述错误和给出解决方法。可能比较复杂,最简单的应该是在def.h中手动设置条件编译宏,不过反正能编译就行,我都是一个窗口make,另一个窗口根据make出错信息编辑代码。其实懂了出错原理后后自己应该也能找出更简单的解决方法。

2.2. 链接错误处理

value.c:3709: undefined reference to `store_typed_floating(void*, type const*, double)’
collect2: error: ld returned 1 exit status

打开value.c找到该函数,ctags跳转到doublest.c中,发现函数第3个参数是DOUBLEST,也就是没找到这个宏或者类型别名的定义。继续ctags跳转到DOUBLEST的定义位置,果然也被条件编译宏包含起来了。从错误信息看它应该是double的类型别名,因此保留typedef double DOUBLEST;的分支。

2.3. 其他编译错误处理

ser-tcp.c

  • 去掉HAVE_SYS_IOCTL_H#ifdef
  • 删除typedef __socklen_t socklen_t的代码。

gregset.h

  • 去掉#HAVE_SYS_PROCFS_H#ifdef块(使得sys/procfs.h被包含);
  • 第一处grepset_t改成elf_gregset_t
  • 第一处fpregset_t改成elf_fpregset_t(这两个类型都定义在sys/procfs.h中);

gdb_proc_service.h

  • 删除lwpid_t的定义;
  • 包含common/common-defs.h

gdb/gdb_wait.h:保留条件编译的sys/wait.h分支;

nat/amd64-linux-siginfo.c:将common-defs.h作为第一个头文件;

gdb_curses.h:保留条件编译的curses.h分支;

在下列C文件中包含config.h作为第一个头文件;

  • auto-load.c
  • doublest.c
  • jit.c
  • main.c
  • top.c
  • utils.c

common/signals.c

  • 去掉HAVE_SIGNAL_H#ifdef块;
  • 包含sys/signal.h

gdb-server/remote-utils.c:把USE_WIN32API,__QNX__之外(其实都在它们前面定义了)的#if/#endif块全部去掉。

gdb-server/linux-low.h

  • 删除Elf_32_auxv_tElf64_auxv_t的定义;
  • 删除HAVE_LINUX_REGSETS#ifdef块(有很多处);
  • 删除USE_THREAD_DB#ifdef块;

3. 安装后出错

common/filestuff.c:401: internal-error: int gdb_pipe_cloexec(int*): pipe not available on this host

找到如下代码:

1
2
3
4
5
6
7
8
9
10
11
12
13
14
15
16
17
18
19
385 #ifdef HAVE_PIPE2
386 result = pipe2 (filedes, O_CLOEXEC);
387 if (result != -1)
388 {
389 maybe_mark_cloexec (filedes[0]);
390 maybe_mark_cloexec (filedes[1]);
391 }
392 #else
393 #ifdef HAVE_PIPE
394 result = pipe (filedes);
395 if (result != -1)
396 {
397 mark_cloexec (filedes[0]);
398 mark_cloexec (filedes[1]);
399 }
400 #else /* HAVE_PIPE */
401 gdb_assert_not_reached (_("pipe not available on this host"));
402 #endif /* HAVE_PIPE */
403 #endif /* HAVE_PIPE2 */

还是条件编译宏的问题,触发了gdb_assert_not_reached,这里保留HAVE_PIPE分支就行了。重新编译安装就OK。

安装时会有个警告导致出错:

gdb-8.0/missing: line 81: makeinfo: command not found

但是并不影响GDB的正常使用,也没必要特地安装makeinfo。至于环境变量和prefix这种东西,就不多讲了。

4. 启用termdebug

要求vim 8.1和GDB 7.12以上,命令:packadd termdebug加载termdebug插件即可。然后在vim中就可启动termdebug调试程序::Termdebug <your-program>

但是默认是横向切分窗口,很不喜欢,vim中:help termdebug可以查看文档,默认会打开gdb窗口和程序窗口,搜索vertical就可以找到配置,只需要在~/.vimrc中设置如下属性即可:

1
let g:termdebug_wide = 163 # 列宽,可调整

运行效果如下:

termdebug示例

Linux C mktime进行时间转换的陷阱

前言

最近做的一个小程序,需要对时间戳和对应日期字符串进行相互转换,于是二话不说直接翻看The Linux Programming Interface(TLPI)查API。翻到了下面这张图:

时间格式转换函数

我的时间戳是自epoch(UTC)以来的毫秒数表示,拟定转换的是年月日时分秒,外加个毫秒,思路就很简单:

  1. 输入字符串:用strptime转换成struct tm类型,再用sscanf读取毫秒,最后用mktimetm对象转换成time_t(自epoch(UTC)以来的秒数)乘以1000加上毫秒数;
  2. 输入时间戳:除以1000得到秒数,模1000得到毫秒数,然后用strftime将秒数格式化,再用snprintf将毫秒数格式化和’.’一起添加到末尾。

当然,输入字符串的情况下,考虑健壮性的话需要对tm对象的各字段进行合法性检查,这里就不详述了。

奇妙的BUG

但是写完后进行测试,输入字符串,转换成时间戳,然后再转换回字符串。发现一个十分奇葩的错误,就是转换回去后比原来要少了1给小时,比如”2000-02-29 10:01:20.094”会变成”2000-02-29 09:01:20.094”,也就是说其他的功能都没错。

在此之前我已经考虑到了时区的问题,因此确认过mktime的输入参数是本地时区,因此strftime的输入参数需要用localtime而非gmtime

为了复现这个BUG,以及描述问题的原因,可以编译运行下面这段代码(忽略了返回值检查):

1
2
3
4
5
6
7
8
9
10
11
12
13
14
15
16
17
18
19
20
21
22
23
24
#include <stdio.h>
#include <time.h>

int main(int argc, char* argv[]) {
if (argc < 2) {
fprintf(stderr, "Usage: %s yyyy-mm-dd hh:mm:dd\n", argv[0]);
return 1;
}
printf("before: %s\n", argv[1]);
struct tm tm_;
strptime(argv[1], "%F %T", &tm_);
auto dump_tm = [](const struct tm* tmp, const char* msg) {
printf("%s: %04d-%02d-%02d %02d:%02d:%02d\n", msg, tmp->tm_year + 1900,
tmp->tm_mon + 1, tmp->tm_mday, tmp->tm_hour, tmp->tm_min,
tmp->tm_sec);
};
dump_tm(&tm_, "before mktime");
auto timestamp = mktime(&tm_);
dump_tm(&tm_, "after mktime");
char buf[128];
strftime(buf, sizeof(buf), "%F %T", localtime(&timestamp));
printf("after: %s\n", buf);
return 0;
}

设置几个时间,运行结果如下:

1
2
3
4
5
6
7
8
9
10
11
12
13
14
15
# ./a.out "2001-02-28 01:00:00"
before: 2001-02-28 01:00:00
before mktime: 2001-02-28 01:00:00
after mktime: 2001-02-28 01:00:00
after: 2001-02-28 01:00:00
# ./a.out "2000-02-29 01:00:00"
before: 2000-02-29 01:00:00
before mktime: 2000-02-29 01:00:00
after mktime: 2000-02-29 00:00:00
after: 2000-02-29 00:00:00
# ./a.out "2004-02-29 01:00:00"
before: 2004-02-29 01:00:00
before mktime: 2004-02-29 01:00:00
after mktime: 2004-02-29 00:00:00
after: 2004-02-29 00:00:00

可以发现中间的输入结果有误,一开始怀疑是闰年的缘故,但是2004年和2000年的结果并不相同,而它们都是闰年。此外实测发现”2000-01-29 01:00:00”也出错。

原因及解决方法

其实问题的关键出在struct tm结构的tm_idst字段,可以发现无论结果是否转换错误,mktime始终把tm_idst重置为0,而调用之前tm_idst为非零值。

这个字段即DST,Daylight Saving Time。若大于0则将该时间视为夏令时,若为0则将该时间视为标准间(忽略夏令时),若小于0则试图使用时区信息和系统数据库来确定设置。而mktime()在进行转换时会对时区进行设置,若DST未生效,则将tm_idst置为0,若DST生效,则会将其置为正值。

因此就是夏令时的问题,struct tm中的tm_idst以及mktime的测试中2001年以前的时间使用DST则会比其他情况晚1小时,当然,这个测试和我的略有出入,但我测试的2001年之后的确实也没出现这问题。

mktime 夏令时则使用了一种叫较为复杂的方法。

这个问题确实造成了不少人的困扰,最简单的方法就是在mktime之前将tm_idst设为-1,让系统为你解决这个问题。但实际上并非如此,比如mktime 夏令时文中就提到了:

俄罗斯时间2008年10月26日2:30由于夏令时的跳变会经过2次,这2次所代表的日历时间明显不同。

stackoverflow上也有讨论:mktime-and-tm-isdst,其中Rich Jahn也提到了即使设为-1也不代表能“自动推断是否使用夏令时:

-1 is a possible input, but I would think of it as meaning “Unknown”. Don’t think of it as meaning “determine automatically”, because in general, mktime() can’t always determine it automatically.

The explicit DST status (0 or 1) should come from something external to the software, for example store it in the file or database, or prompt the user.

最好的解决方法还是在时间后面加上UTC,比如:

1
2
struct tm tm_;
char* p = strptime("2004-02-29 01:00:00.039 UTC", "%F %T", &tm_);

调用完毕后返回值p指向的是".039 UTC",后缀UTC并不影响返回值,因此仍然可以对p进行sscanf或者strtol操作获取毫秒数。

我的vim开发环境搭建(3): Go开发配置

1. Go的安装

嗯因为Go的官网被墙了所以需要自行准备梯子。Linux安装Go很简单,即使是CentOS 6,直接去golang下载页下载二进制文件解压即可,比如我写这篇博客时的最新版本是1.12.6,下载解压即可:

1
2
3
4
wget https://dl.google.com/go/go1.12.6.linux-amd64.tar.gz
tar zxvf go1.12.6.linux-amd64.tar.gz -C ~/local/
cd ~/local/go
mkdir gopath

我这里依旧是解压到~/local目录,另外新建了gopath目录。然后在~/.bashrc中添加环境变量:

1
2
3
4
export PATH=$LOCAL/go/bin:$PATH
export GOROOT=$LOCAL/go
export GOPATH=$GOROOT/gopath
export GOBIN=$GOPATH/bin

GOROOT指的是Go的安装目录,而GOPATH则是自定义路径,不一定要在GOROOT下,而且可以有多个路径,每个路径代表Go的一个工作区,一般的工作区由srcpkgbin三个目录组成,比如go get远程下载的项目,而GOBIN则是安装的二进制文件的路径。

2. 重新编译YCM

之前安装的YCM能够对C/C++进行补全,要对Go进行补全需要加上--go-completer选项重新编译,不过由于已经存放过编译的中间文件了,所以这次编译会很快。

1
2
CC="$LOCAL/gcc-5.4.0/bin/gcc" CXX="$LOCAL/gcc-5.4.0/bin/g++" ./install.py  \
--clang-completer --system-libclang --go-completer

编译完毕后基本的补全功能已经有了,如下图所示:

YCM对Go的补全

Go的编码规范建议使用TAB而非空格表示缩进,因此之前的vim配置中set expandtab最好注释掉,防止把TAB扩展成空格。

YCM对Go的补全无需像C++一样通过.ycm_extra.conf.py脚本来指定头文件包含目录的,它是通过直接分析处于$GOROOT/pkgGOPATH/pkg下的静态库.a文件来获取补全信息的。

由于Go标准库的静态库已经编译好,位于$GOROOT/pkg/$GOOS_$GOARCH目录下,环境变量可通过go env命令来查询。而对于go get或者$GOPATH/src下的项目,如果没有编译成静态库,YCM是无法补全的,因此要用到某些包时需要首先进入包所在目录go install

如果使用了本地包比如import "./local",那么需要把local.a文件拷贝到和当前.go文件同一目录。

3. vim-go

1
Plug 'fatih/vim-go', { 'do': ':GoUpdateBinaries' }

安装、使用可参考vim-go的README,某些二进制文件地址被墙了,所以需要去镜像站下载。

然而打开.go文件时会提示

1
vim-go: could not find 'gopls'. Run :GoInstallBinaries to fix it

然而用:GoInstallBinaries会失败,因为某些二进制文件被墙了,打开vim-go项目目录下的plugin/go.vim可以找到:

1
2
3
4
5
6
7
8
9
10
11
12
13
14
15
16
17
18
19
20
21
22
23
24
25
" these packages are used by vim-go and can be automatically installed if
" needed by the user with GoInstallBinaries.
let s:packages = {
\ 'asmfmt': ['github.com/klauspost/asmfmt/cmd/asmfmt'],
\ 'dlv': ['github.com/go-delve/delve/cmd/dlv'],
\ 'errcheck': ['github.com/kisielk/errcheck'],
\ 'fillstruct': ['github.com/davidrjenni/reftools/cmd/fillstruct'],
\ 'gocode': ['github.com/mdempsky/gocode', {'windows': ['-ldflags', '-H=windowsgui']}],
\ 'gocode-gomod': ['github.com/stamblerre/gocode'],
\ 'godef': ['github.com/rogpeppe/godef'],
\ 'gogetdoc': ['github.com/zmb3/gogetdoc'],
\ 'goimports': ['golang.org/x/tools/cmd/goimports'],
\ 'golint': ['golang.org/x/lint/golint'],
\ 'gopls': ['golang.org/x/tools/cmd/gopls'],
\ 'gometalinter': ['github.com/alecthomas/gometalinter'],
\ 'golangci-lint': ['github.com/golangci/golangci-lint/cmd/golangci-lint'],
\ 'gomodifytags': ['github.com/fatih/gomodifytags'],
\ 'gorename': ['golang.org/x/tools/cmd/gorename'],
\ 'gotags': ['github.com/jstemmer/gotags'],
\ 'guru': ['golang.org/x/tools/cmd/guru'],
\ 'impl': ['github.com/josharian/impl'],
\ 'keyify': ['honnef.co/go/tools/cmd/keyify'],
\ 'motion': ['github.com/fatih/motion'],
\ 'iferr': ['github.com/koron/iferr'],
\ }

如注释所言,:GoInstallBinaries实际上是把这些二进制文件安装到本地,由于golang.org被墙了,所以相关工具无法下载。即使是github上的项目,克隆速度也慢得感人,所以还是手动下载安装。

3.1 手动安装二进制文件

fillstruct为例:

1
2
3
4
5
mkdir -p $GOPATH/src/github.com/davidrjenni
cd $GOPATH/src/github.com/davidrjenni
git clone https://github.com/davidrjenni/reftools.git
cd reftools/cmd/fillstruct
go install

注意go.vim中的cmd/fillstruct后缀指的是克隆的项目的子目录,因此流程是先克隆项目本身,再进入相应子目录安装。go install安装完后会发现$GOPATH/bin下多了二进制文件fillstruct

实际上上述流程是手动进行了go get的流程,但是能够判断出错到底是git clone还是go install,前者出错可能就是访问太慢甚至无法访问,后者则是可能项目里引用了未安装的包。

3.2 安装依赖包

并非所有项目都像fillstruct那么顺利,比如在安装errcheck时就提示:

1
2
3
4
$ go install
internal/errcheck/errcheck.go:19:2: cannot find package "golang.org/x/tools/go/packages" in any of:
/home/xyz/local/go/src/golang.org/x/tools/go/packages (from $GOROOT)
/home/xyz/local/go/gopath/src/golang.org/x/tools/go/packages (from $GOPATH)

其中/home/xyz是我的HOME目录,出现这个错误就是因为"golang.org/x/tools/go/packages"包没有安装,而由于golang.org被墙了,go get安装会失败,不过好在可以从golang的github镜像站去找到对应的项目,然后下载安装,以此为例:

1
2
3
4
cd $GOPATH
mkdir -p src/golang.org/x
cd src/golang.org/x
git clone https://github.com/golang/tools.git

然后再重新在errcheck目录下go install即可。

3.3 特别操作

  1. stamblerre/gocode,由于生成的是gocode-gomod而非默认的gocode,因此需要指定二进制名称(似乎go install无法做到):
1
2
go build -o gocode-gomod
mv gocode-gomod $GOPATH/bin
  1. honnef.co/go/tools/cmd/keyify,在github上有镜像
1
2
3
4
5
cd $GOPATH/src
mkdir -p honnef.co/go
git clone https://github.com/dominikh/go-tools.git honnef.co/go/tools
cd honnef.co/go/tools/cmd/keyify
go install

3.4 最终安装结果

安装的二进制文件如下:

1
2
3
4
$ ls $GOBIN
asmfmt fillstruct godef golangci-lint gomodifytags gotags impl
dlv gocode gogetdoc golint gopls guru keyify
errcheck gocode-gomod goimports gometalinter gorename iferr motion

从golang的github镜像上分别克隆了3个项目:

1
2
$ ls $GOPATH/src/golang.org/x
lint sync tools

3.5 其他说明

vim-go的具体使用方式,参考vim-go Tutorial

打开go文件时会出现下列错误

1
vim-go: Features that rely on gopls will not work correctly in a null module.

解决方法参考#2301,在.vimrc中添加下列代码即可:

1
let g:go_null_module_warning = 0

此外GoRename命令只有在项目目录在$GOPATH/src下时才能使用,否则会出现can't find package containing错误。

4. 总结

由于是在之前的基础上进行,所以Go开发环境的搭建较为简单,安装Go、重新编译YCM,Ultisnip已经有了,剩下的就是vim-go的安装了。其实最重要的还是YCM的补全功能。

虽然我vim-go用得也不多,主要就是用了下将gofmt集成进vim的:GoFmt命令,毕竟上手Go的时间也不长。话说才发现现在保存文件时就会自动格式化了,无需手动输入:GoFmt命令。

安装vim-go的主要难点在于各种远程包,在我的电脑上几乎是全程开代理下载,有时候git代理不太好使就直接在VPS上克隆完毕后,打包、FTP下载、FTP上传、解压。

之前实习时安装vim-go去解决各种go get的问题了,go get虽然方便,但是出错的话难以及时发现错误在哪,感觉在国内这个网络环境下,还不如手动克隆、安装。